Hi friends.
Everything is all right here, and in my head there's a lot of building going on but at the cutting mat there's nothing going on. I am afraid that because of all the job related stuff and some seasonal family activities there was not ny time really to get the building stuff off the ground again.
I might give it a try one of these days but I think the next start will be early January.
I'll pick up building the Saturn again and hopefully with a little more success.
From here I wish you all a very good, healthy, creative and productive 2014.
See you soon!
--PK

28 December 2013
03 December 2013
Yeah, it's going slow.
I know, it is going slow.
Lots of stuff concerning an upcoming shoot in Cologne for a new documentary is taking its toll and besides that I have been doing some plastic stuff because I felt like it. It still is not as satisfying as paper stuff but I had some unfinished business to attempt and I wanted to do two small ones.
Besides, the work on the Saturn is a bit repetitive and tedious to show at the moment. Still four engines to go before attacking the base plate of the S1C stage. Since the engines will be all the same I am not planning to show all of the building of it.
Here's what I have now, and after the jump I will show you the two plastic projects I have finished.
Thanks for hanging in there, before this year is over I will hopefully be back at full speed.
--PK
 |
| Engine number two nearing completion. |
17 November 2013
Saturn V - retry - now from the ground up.
I have found the time to restart and rethink the build of the Saturn V.
The first steps were made yesterday. The first F-1 is almost done and I also think it actually is a good continuation point from the big 1/48th engine from a while back.
I used coloured paper for a lot of parts, since the whole engine will be covered in aluminium tape, representing the thermal blanket covers on the actual flown ones. It might be a bit too shiny but I'll try and add a matte varnish over it later on to tone it down.

So, here's what I did so far. Needless to say, the F-1 is also very much doable in 1/96.
Three more pics after the jump.
09 November 2013
I'm still here, don't worry.
I just am fiddling a bit with some small plastic models at the moment to get my mind off of the Saturn thing. I am kind of brooding on how to restart but there is absolutely no hurry in that project.
I just finished a 1/72 F9F Panther I had laying around unfinished for a couple of months already. I consider the Panther a very well-shaped plane, its lines are beautifully curved and it's an overall aesthetically pleasing object. As almost usual with my plastic models, I did a what-if scheme. This one is painted as a member of a fictitious Dutch demo team of the early sixties. I now work on a little Airfix 1/72 Tucano, which I think is a nice aircraft. A bit crude here and there but the panel lines are crisp and the plastic is nicely moulded. I could post some pictures but I can't really be bothered because this stuff is a little marginal to me. More paper building soon! Thanks for the patience.
I just finished a 1/72 F9F Panther I had laying around unfinished for a couple of months already. I consider the Panther a very well-shaped plane, its lines are beautifully curved and it's an overall aesthetically pleasing object. As almost usual with my plastic models, I did a what-if scheme. This one is painted as a member of a fictitious Dutch demo team of the early sixties. I now work on a little Airfix 1/72 Tucano, which I think is a nice aircraft. A bit crude here and there but the panel lines are crisp and the plastic is nicely moulded. I could post some pictures but I can't really be bothered because this stuff is a little marginal to me. More paper building soon! Thanks for the patience.
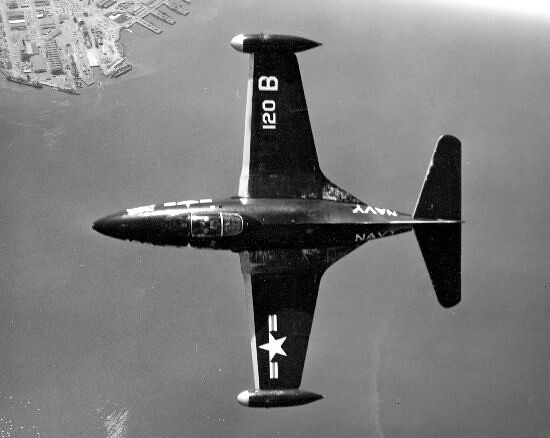 |
| The F9F Panther in a bank, showing its nice shapes. Photo: from Flickr |
 |
| The Tucano. Photo:http://www.aircraftrecognition.co.uk |
01 November 2013
Saturn V postponed!
At the moment the Saturn V project is going to be put on hold for an indefinite duration. It is more than I can bite off at the moment. I have tried to start over again a couple of times now and every time there are slight problems, one time it's glue that won't stick, then it's wrong measurements, then a white surface suddenly becomes very smudged...
Argh! Frustration upon frustration.

It's just a little too much now. A build must be fun and this isn't. There is a lot of stuff going on besides this hobby and this Saturn V - project now just is a little too big. It will be on hold until the time is there to pick it up again.
In the meantime I will occupy myself with more bite-size and off-the-shelf stuff, I guess. There still is enough other stuff to build!
-PK
26 October 2013
Saturn V 1/96 build report [004]: countdown on hold
Just a little and short update:
I have postponed the build of the Saturn. It's all a paper issue, the used paper won't stick in any way. the backside is plain so there is no problem there, but the visible shiny metallic front is just not able to hold any glued object. it almost is like a non-stick Teflon pan. It gives me hell and I am fed up with it.
When I bought it, I thought it looked very good and would serve me well but well, it didn't.
regular white glue just slides off, Aleene's tacky glue is still tacky but cannot keep things in place, and CA mists up the entire insides of the tank's wall. And that makes this build just an impossible and very un-enjoyable piece of sh*t.
This type of paper might be useful for other projects it really is beautiful stuff for metallic skins, actually but without having to glue stuff on its surface. So it's not going to be used for this particular project.
It means I will have to restart. Again. oh well. I now know some other building issues that now are easily solved and I think with this problem out of the way, the build of the RP-1 tank might be a little easier too. I am going back to the paper I know is workable in this situation. Although it is not as smooth surfaced, it still is very metallic and therefore useful.
Here's a couple of pictures of the build I'll be disassembling now for further usage of the dome structure in the next try.


Here you can clearly see the misting effect the CA has on the surface.
It really is beautiful metallic of itself but well, if it doesn't stick to anything it's just useless to me.
Hopefully I will have a new update ready shortly.
I have postponed the build of the Saturn. It's all a paper issue, the used paper won't stick in any way. the backside is plain so there is no problem there, but the visible shiny metallic front is just not able to hold any glued object. it almost is like a non-stick Teflon pan. It gives me hell and I am fed up with it.
When I bought it, I thought it looked very good and would serve me well but well, it didn't.
regular white glue just slides off, Aleene's tacky glue is still tacky but cannot keep things in place, and CA mists up the entire insides of the tank's wall. And that makes this build just an impossible and very un-enjoyable piece of sh*t.
This type of paper might be useful for other projects it really is beautiful stuff for metallic skins, actually but without having to glue stuff on its surface. So it's not going to be used for this particular project.
It means I will have to restart. Again. oh well. I now know some other building issues that now are easily solved and I think with this problem out of the way, the build of the RP-1 tank might be a little easier too. I am going back to the paper I know is workable in this situation. Although it is not as smooth surfaced, it still is very metallic and therefore useful.
Here's a couple of pictures of the build I'll be disassembling now for further usage of the dome structure in the next try.


Here you can clearly see the misting effect the CA has on the surface.

It really is beautiful metallic of itself but well, if it doesn't stick to anything it's just useless to me.
Hopefully I will have a new update ready shortly.
15 October 2013
Saturn V 1/96 build report [003]
The first tank dome is there. It's the LOX bottom tank dome, and the other domes all will be built before the actual tanks will come into existence. This is because of the LOX fuel lines that go through the RP-1 tank. I need to know where the pipes have to go in the bottom RP-1 dome and then adapt the top RP-1 dome. maybe a little hard to explain here, but you will see what I mean in a couple of days. At least, I hope so. Here is the first dome anyway.
It is made from two layers, the outer one being light (narcissus)yellow paper with a bit of a grain which depicts the isolation layer nicely. The inside is made from aluminium coloured paper. The rings around the holes inside are from chrome coated paper. it all looks exactly how I wanted. I hope the other three domes come out equally nice (or better).
after the jump three more pictures.

See you soon,
--PK
12 October 2013
Saturn V 1/96 build report [002]
A little progress was booked today. Although I still had some printer issues (black ink gradually fading across the page - %^$##@!!1) I managed to assemble a part of the RP-1 tank. It still is far from finished but there is a start! In the end I also got the printer to make a decent print after all. But I had to increase the amount of ink used considerably.

The insides are made from matted but very metallic looking card, which will be further detailed in the coming days. It is not glued yet. The upper ring is there for measure, not for attachment purposes. The lower rings are there to keep the cylinder in shape.

The insides are made from matted but very metallic looking card, which will be further detailed in the coming days. It is not glued yet. The upper ring is there for measure, not for attachment purposes. The lower rings are there to keep the cylinder in shape.
11 October 2013
Saturn V 1/96 build report [001]
In advance: Expect this to become a long lasting series of off-and-on build reports. This project is really going to take a lot of time.
This also is probably going to be a journey with a lot of setbacks and slow progress involved. This stuff already happened when a couple of days ago my precious circle cutter broke. The thing is made from solid plastic and has a metal slider on which end the blade is held. The slider is kept in place by a metal nut which twists around a plastic screw. This screw broke off and unfortunately it wasn't repairable. This set me back 40 euros because I really need this cutter for al the rings and bulkheads. A necessary investment.
For some time now I already have been experimenting with pieces and parts to try out shapes and fitting issues. Researching where I want to have the openings in the rocket's hull (They have to be on one side all the way to the top) and looking up where vent holes, valve umbilicals and other thingamabobs are to be found.
The U.S. government shutdown isn't making things easier at the moment because everything at NASA is blocked and there are an awful lot of other sites normally having great information but all their links to specific sites (NASA again) are dead ends (thanks a lot, GOP congress members, you belong without a doubt to the silliest bunch of people in the world - and I express myself quite mildly here).
This also is probably going to be a journey with a lot of setbacks and slow progress involved. This stuff already happened when a couple of days ago my precious circle cutter broke. The thing is made from solid plastic and has a metal slider on which end the blade is held. The slider is kept in place by a metal nut which twists around a plastic screw. This screw broke off and unfortunately it wasn't repairable. This set me back 40 euros because I really need this cutter for al the rings and bulkheads. A necessary investment.
 |
| My dear old broken circle cutter with the metal slider and screw removed. The metal parts now are reserve parts but these plastic bits are a goner. )-: |
The U.S. government shutdown isn't making things easier at the moment because everything at NASA is blocked and there are an awful lot of other sites normally having great information but all their links to specific sites (NASA again) are dead ends (thanks a lot, GOP congress members, you belong without a doubt to the silliest bunch of people in the world - and I express myself quite mildly here).
10 October 2013
Clear skies, Scott.
Today Scott Carpenter died from complications after suffering a stroke. He was 88 years old. He was the second American to orbit the earth. His only spaceflight, with a Mercury capsule called Aurora 7, ended in a bit of a messy situation when he overshot his designated landing spot by several hundred kilometres. because of a malfunctioning horizon scanner he used a lot of manoeuvring fuel during his orbits but also suffered several malfunctions at re-entry that caused him to push the retro rockets manually, which occurred almost a second too late. The thrust of the retro's also was not optimal and all of this caused the overshoot. He also was the one that spoke the words "Godspeed, John Glenn" when Glenn lifted off as the first American to orbit the earth.
After a motorcycle accident in 1964 he suffered loss of function of one of his arms and that resulted into losing his chance to return into space. But I presume his not so perfect Mercury flight also might have played a role in the decision to take him off the list for another flight.
He turned into an aquanaut for the Navy in the late sixties, working in underwater laboratories.
Carpenter was one of the first to explore the New Ocean and just for that reason alone he already was a pioneer and a vanguard. He might not have been NASA's ideal astronaut in that time but he certainly was a tough man, having to endure the gruesomeness of those first astronaut's medical tests and become one of the Original Seven. His old colleagues, Alan Shepard, Gus Grissom, Gordo Cooper, Wally Schirra and Deke Slayton already passed away earlier.
This leaves his good friend John Glenn the only one still alive of the Original Seven.
After a motorcycle accident in 1964 he suffered loss of function of one of his arms and that resulted into losing his chance to return into space. But I presume his not so perfect Mercury flight also might have played a role in the decision to take him off the list for another flight.
He turned into an aquanaut for the Navy in the late sixties, working in underwater laboratories.
 |
| Malcolm Scott Carpenter © NASA |
This leaves his good friend John Glenn the only one still alive of the Original Seven.
01 October 2013
Saturnial interlude: Design and doodle time.
While I appear to be idle at the moment, there's a lot going on in my grey matter up in my head.
Mostly when I am doing boring or numbing stuff like trying to get to sleep or while I am doing some training exercises on some fitness contraption, I am thinking about how I have to tackle certain aspects of the Saturn V build I am planning. Studying imagery of the beast and sometimes asking experts on the web about details I cannot seem to find an answer to.
During this process the rocket comes to life in my mind. I am starting to be able imagining all the nooks and crannies, or at least the ones I can make and put into my model. I start making little doodles and detailed drawings of parts in the sketch books I carry with me all the time:
More importantly, I can ponder over how the thing has to be assembled. What do i build
first and what next? My girlfriend, surprisingly, came up with the perfect solution for one of the biggest issues I was trying to solve. (She usually shows a complete disinterest in spaceflight and only is amazed at times when she sees the size of a new model I made.) "Why not try and follow the way they build the rocket for real?" she suggested and the longer I thought about it (which was about ten seconds at most) the more this idea made sense.
Now, another point is the size. Measuring Greelt's pieces and resizing them 50% to get 1/96 turned out the parts are a little too large. 48,20% happened to be the right number to use for reducing to 1/96. I already have bought some nice pieces of paper to start with but the actual build might be some time further away in the future.
And I start to make small sketches and drawings to learn the Saturn's looks and where its doodads, thingamabobs and whatchamecallits go. (I won't bother with the real names for now…) These sketches help a lot in creating a 3D picture of the rocket in my mind and later on in paper. The building soon will start, In the meantime, after the jump you can find some more of my sketches.
--PK
Mostly when I am doing boring or numbing stuff like trying to get to sleep or while I am doing some training exercises on some fitness contraption, I am thinking about how I have to tackle certain aspects of the Saturn V build I am planning. Studying imagery of the beast and sometimes asking experts on the web about details I cannot seem to find an answer to.
During this process the rocket comes to life in my mind. I am starting to be able imagining all the nooks and crannies, or at least the ones I can make and put into my model. I start making little doodles and detailed drawings of parts in the sketch books I carry with me all the time:
 |
| And Yes, I am a Dutchy but I often provide my modeling doodles with English notes. You figure out. |
More importantly, I can ponder over how the thing has to be assembled. What do i build
first and what next? My girlfriend, surprisingly, came up with the perfect solution for one of the biggest issues I was trying to solve. (She usually shows a complete disinterest in spaceflight and only is amazed at times when she sees the size of a new model I made.) "Why not try and follow the way they build the rocket for real?" she suggested and the longer I thought about it (which was about ten seconds at most) the more this idea made sense.
Now, another point is the size. Measuring Greelt's pieces and resizing them 50% to get 1/96 turned out the parts are a little too large. 48,20% happened to be the right number to use for reducing to 1/96. I already have bought some nice pieces of paper to start with but the actual build might be some time further away in the future.
And I start to make small sketches and drawings to learn the Saturn's looks and where its doodads, thingamabobs and whatchamecallits go. (I won't bother with the real names for now…) These sketches help a lot in creating a 3D picture of the rocket in my mind and later on in paper. The building soon will start, In the meantime, after the jump you can find some more of my sketches.
--PK
24 September 2013
Saturnial Prelude [7]: The finished F-1
Sunday and today I've worked on a little way to display the finished F-1 engine. I took some thick yellow paper and scratch built this little transport cart for the engine. I then grabbed a photo frame and quickly designed a concrete block paved surface. Here's the final result of my Rocketdyne F-1 engine model.
I hope you like it. Up next maybe an inbetweenie, or maybe the start of something really big...
'til then, thanks for watching!
--PK

(A lot more after the jump, as usual.)
I hope you like it. Up next maybe an inbetweenie, or maybe the start of something really big...
'til then, thanks for watching!
--PK

(A lot more after the jump, as usual.)
22 September 2013
Saturnial Prelude [6]
The F-1 engine has been finished. All the piping is added and I am quite pleased with it. But the whole display is not entirely finished. I now am working on a small kart on which the engine was transported from one assembly hall to another. That will come later, here's the pictures of the finished Rocketdyne F-1 engine.

And as usual, more after the jump.
Thanks for taking a look!
--PK

And as usual, more after the jump.
Thanks for taking a look!
--PK
20 September 2013
Saturnial Prelude [5]
Time is precious, and that's not any different with this build. There's a lot to do besides paper building and so progress is slow. But I like what I see. Since I redid the small plumbing at the side of the turbo pump manifold, I really got back into this build. This engine started out as having to end up as another version of Greelt's F-1 engine, which is, in all regards, a beaut. But after the engine bell was made, I just started freewheeling as usual. Discarding most of the parts of the paper kit, making my own and just trying to make as much detail as possible.
I have started on the big tubes around the neck of the engine. These pipes directly distribute the fuel and oxidizer to the turbo pump and the engine. The amount of fuel they needed was incredibly high so they needed to be big.
I also found out the engine went through a lot of modifications before they were used with the Saturn in the end. This version is, in a sense, becoming a bit of a Frankenstein's monster. Greelt used the rounded manifold around the engine bell, while the flown engines had a shape that more or less resembled one's back end. Also, the plumbing differs a lot between versions I have pictures of. Presuming the engine didn't change a lot after the first couple of flights, I presume the other large differences are all older versions of the engine. (if not, let me know, I really am interested in those things).
Anyway, here's some paper stuff to look at. And as usual, more after the jump.
See you!
--PK

17 September 2013
Saturnial prelude [4]
Details. And redo's. I decided for example to redo the little plumbing lines that go from the engine bell's neck to the turbopump's manifold. They were too ugly after all. I now didn't use primer before painting them silver. The rest just are some more progress pictures with not much textual to add.


15 September 2013
Saturnial prelude [3]
Hi people, it's plumbing time. There is a real labyrinth of tubes, pipes and connectors all over the top part of a rocket engine, and that is especially the case with this one. The F-1 was immensely complex and because it was enormous, the amount of plumbing also was quite considerably. There was a huge
quantity of fuel that needed to be used and distributed all through the engine at an incredibly high speed. Don't worry, I am not going to explain the details of how this engine worked but all I am saying is that it took a lot of tubes and pipes and whatnots.
Using a busload of pictures which I got by email by my friend Zoltan (thanks!) I now am slowly adding most of it to my paper engine. This will take some time, which I only have in small quantities at the moment, so the progress will be small. Today I did most of the first quadrant of the F-1. It isn't all completely accurate but it gives a good idea of the overall look of the engine.
And it all starts with measuring, fitting, measuring again and fitting again and only then the gluing bit.
 As you can see, I already added the pipe leading to the turbo pump fuel exhaust manifold here. (It's the little pipe on the left with the wider opening on top.) For the characteristical foursome of pipes next to it, I use green floral wire. It is easily bendable and sturdy at the same time. The engine bell itself is also cooled with fuel. The liquid nitrogen was
so cold, it easily could make this little detour through small tubes
that together are shaped like the engine bell. (this is shown in the
print.) Some vents were placed on both sides of the engine bell to
prevent overpressure. These pipes were made from rolled-up paper.
As you can see, I already added the pipe leading to the turbo pump fuel exhaust manifold here. (It's the little pipe on the left with the wider opening on top.) For the characteristical foursome of pipes next to it, I use green floral wire. It is easily bendable and sturdy at the same time. The engine bell itself is also cooled with fuel. The liquid nitrogen was
so cold, it easily could make this little detour through small tubes
that together are shaped like the engine bell. (this is shown in the
print.) Some vents were placed on both sides of the engine bell to
prevent overpressure. These pipes were made from rolled-up paper.
The rest of the story is after the jump.
quantity of fuel that needed to be used and distributed all through the engine at an incredibly high speed. Don't worry, I am not going to explain the details of how this engine worked but all I am saying is that it took a lot of tubes and pipes and whatnots.
Using a busload of pictures which I got by email by my friend Zoltan (thanks!) I now am slowly adding most of it to my paper engine. This will take some time, which I only have in small quantities at the moment, so the progress will be small. Today I did most of the first quadrant of the F-1. It isn't all completely accurate but it gives a good idea of the overall look of the engine.
And it all starts with measuring, fitting, measuring again and fitting again and only then the gluing bit.

The rest of the story is after the jump.
12 September 2013
ALT 1977 1/400 [23]: The final pictures
As promised, I now finally have some pictures for you with a nice blue sky with some white clouds as a backdrop for my ALT 1977 diorama. I used a flash to highlight the stack a little more otherwise it'd be just a silhouette. In the last picture (after the jump) you can see my out-of-focus thumb and first I felt the picture was bad because of that but then I realised it still was a nice reminder of the actual scale. So I left it like that. And now, without further ado, here's the last couple of photos of the SCA/Enterprise stack. Hope you like them.
--PK

--PK

07 September 2013
Saturnial Prelude [2]
Just a little further. I made a lot of extra parts out of metallic coloured paper. And I used aluminium sticky tape for the welds of the gas turbine exhaust manifold. Is there more to say? No. Are there some photos then? Yes. Three. And here they are.


We're still far from ready. So there will be more to come! Stay tuned.
--PK


We're still far from ready. So there will be more to come! Stay tuned.
--PK
06 September 2013
Saturnial Prelude [1]
One of the items of my long list of to-do builds was the Rocketdyne F-1 engine in 1/48. And since the next big build will indeed be the Saturn V, I thought it appropriate to start the whole cycle with a little prelude; the building of an 1/48 F-1 without the heat shield blankets it had in flight.
There's only one F-1 that matters and that's Greelt Peterusma's F-1. Obviously intended to be part of an entire Saturn V rocket, Greelt never came further than the full S-Ic first stage, the J-2 engine and the interstage between the first stage and the S-II.
However, the model is legendary and I already once made one of his J-2 engines in 1/96. That was very doable and gave me the confirmation the F-1 certainly was able to be made in that scale. So tht will be integrated in the paper versin of the complete Saturn V later on.
Now it's time to do the big one. The F-1 is size-wise the biggest rocket engine ever built*. Modern technical advantages make engines like the Russian RD-180 much more powerful and fuel-efficient. Nevertheless, for its time the F-1 was a milestone in rocket engineering. And it still is an awesome beast to look at. So here's the first part of my 1/48 F-1 engine!

(full story after the jump)
*There was one engine planned that would've been bigger than the F-1 and that was called the M-1. But that was never made, because the rocket it was intended for, the immensely huge Nova, was cancelled.
05 September 2013
It looks like there's nothing going on...
...But that's not true at all.
Inside my head I am dealing with the things I think might be the main obstacles in the next big build. Trying to visualise the parts and construction in my head makes it a lot easier for me for when the time is there to actually build the model.
Also making drawings is helping to make the model come to life for me. Pretty soon I will treat you here on a smorgasbord of little drawings I made of how I envision what I want to build.
I also have bought a lot of new paper already. Funnily, it only cost me about 5 euros. For that amount of money one can't even buy a proper plastic model of an aircraft.
(I said: proper)
The first thing I am going to build in the coming weeks is an 1/48 F-1 engine.
This way I can make a nice big engine model that is showable without the batting the original engines had. The rest of 'em will be built in 96th with the batting around them.
More in a little while. Thanks for keeping visiting here.
--PK
Inside my head I am dealing with the things I think might be the main obstacles in the next big build. Trying to visualise the parts and construction in my head makes it a lot easier for me for when the time is there to actually build the model.
Also making drawings is helping to make the model come to life for me. Pretty soon I will treat you here on a smorgasbord of little drawings I made of how I envision what I want to build.
I also have bought a lot of new paper already. Funnily, it only cost me about 5 euros. For that amount of money one can't even buy a proper plastic model of an aircraft.
(I said: proper)
The first thing I am going to build in the coming weeks is an 1/48 F-1 engine.
This way I can make a nice big engine model that is showable without the batting the original engines had. The rest of 'em will be built in 96th with the batting around them.
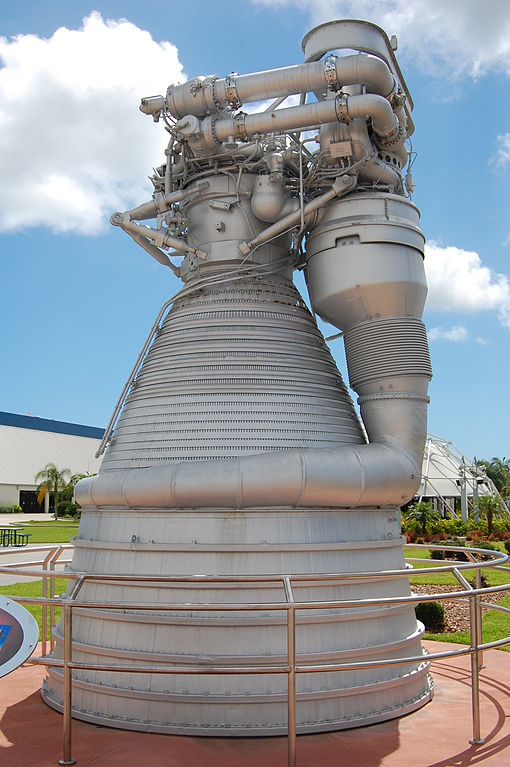 |
| An F-1on display at KSC. The base of the engine bell is 3,70 meter and the height is 5, 80 meter. Not what you call a small engine. This is how it looks without the batting. (picture source: Wikipedia) |
 |
| And this is how it looked, bolted down underneath the Saturn. The batting was made from asbestos, so not the healthiest stuff to be around. But it apparently helped the engine staying in one piece during lift off. (picture source:The Apollo Saturn reference Page) |
--PK
02 September 2013
Oh, the sweet vacuum after finishing a build...
The SCA with the Enterprise on her back has flown into the world, together with the three T-38's.
And the cutting mat is cleaned up again, the paper shreds are in the waste paper basket and the tools and knife are at their storage location. Another build can be ticked off of the list.
Now what's next?
I am not going to sit back and relax. There is, as usual, already some new project lurking in the corners of my mind and it's getting near the surface. There already is some research on the way and I am gathering facts and details. That's half of the fun, really. Getting to know your topic. I know there are some things waiting, like the Loral 1300 bus I started. And I promise that will be finished too some day. But for now there is a new big project coming up and when I mean big I mean big - well, at least for me it's big.
More on that later. There might be an inbetweenie or two before I start the big one.
For now, I'm still doing research, tests and a couple of small pre-build modifications.
Curious? well, you've got to stay curious for a little longer then.
Oh, allright, one teaser, then.
See you soon!
--PK
And the cutting mat is cleaned up again, the paper shreds are in the waste paper basket and the tools and knife are at their storage location. Another build can be ticked off of the list.
Now what's next?
I am not going to sit back and relax. There is, as usual, already some new project lurking in the corners of my mind and it's getting near the surface. There already is some research on the way and I am gathering facts and details. That's half of the fun, really. Getting to know your topic. I know there are some things waiting, like the Loral 1300 bus I started. And I promise that will be finished too some day. But for now there is a new big project coming up and when I mean big I mean big - well, at least for me it's big.
More on that later. There might be an inbetweenie or two before I start the big one.
For now, I'm still doing research, tests and a couple of small pre-build modifications.
Curious? well, you've got to stay curious for a little longer then.
Oh, allright, one teaser, then.
| source: Wikimedia Commons |
--PK
01 September 2013
ALT 1977 1/400 [22]: Finished!
Here it is. Shuttle Enterprise on her way to the first free flight. The frame measures 31 x 42 cm, the T-38s are just short of 35 mm. The shuttle / SCA stack is 180 mm in length.
The sky unfortunately is overcast, so I couldn't take any nice photos with the sky as a backdrop. That will come later, I promise you.
Here are some photos for the time in between.
After the jump, there are five more photos.
The sky unfortunately is overcast, so I couldn't take any nice photos with the sky as a backdrop. That will come later, I promise you.
Here are some photos for the time in between.
 |
| You can click for bigger. |
31 August 2013
ALT 1977 1/400 [21]
Nearing completion. Just one more T-38 to go. Originally there were five Talons flying chase at the first free flight (which this diorama will depict) but there is only so much room within the frame. So there will be three in the frame. More aircraft would make it all a bit unrealistic. So here's the second T-38 build in a couple of photos. the final result is here, the actual scale is better to compare after the jump, where you also will find a series of photos of the making of.
I hope you like it. Thanks for taking a look!
--PK
I hope you like it. Thanks for taking a look!
 |
| This is a 1/400 sized T-38 Talon. for those who don't know: Each square on the cutting mat is 10x10mm. That's roughly 0,39370079 X 0,39370079 inch. |
--PK
30 August 2013
ALT 1977 1/400 [20]
This morning, I have made the struts on the back of the SCA. The original parts that came with the 1/144 model were just a bit too small to easily cut and shape and glue and make it look good. So I scratch built the entire structure. I used rolled up pieces of paper and card board. Most of it was glued using white glue but I reinforced it with a little drop of CA.
It's not finished yet, there have to be two more T-38 Talons made before the diorama is ready to be shown.
But for now, here's the SCA's struts close up after the jump and to begin here, the assembled shuttle and SCA together.
More tomorrow, I think.

It's not finished yet, there have to be two more T-38 Talons made before the diorama is ready to be shown.
But for now, here's the SCA's struts close up after the jump and to begin here, the assembled shuttle and SCA together.
More tomorrow, I think.

29 August 2013
ALT 1977 1/400 [19]: Enterprise, part 2
Here's the orbiter with what I think had the smoothest lines. the almost sensual curved black surface around the nose, the clean windows, the immaculate white surface. I always have disliked the 1983 redo with the harsh black lines around the windows and the extra useless black lines over the nose to make it resemble its space-going sisters more.
The tail cone was a very nice piece to assemble. I discarded almost all the glueing tabs, though. In this size, it would've been much too heavy. I did a lot of edge glueing here, especially on the curved parts of the tail cone.
Up next are the attachment struts of the SCA and two more T-38 Talon jets.
Here are some pictures to enjoy.

As usual, the rest is found after the jump.
Thanks for stopping by!
--PK
28 August 2013
ALT 1977 1/400 [18]: Enterprise, part 1
Time for the Enterprise to come into existence.
I have started over three times on this little shuttle. First, due to some stupid printer error (I guess I mean myself) the frame was 3mm too large for the skin to wrap around. so, I started over and saw those rectangular shapes on the nose that had a much too prominent presence, in my eyes.
So, back to the drawing board and a reprint for the 3rd time. And this one is what you see here.
The rest of the pictures is below, after the jump.
I have started over three times on this little shuttle. First, due to some stupid printer error (I guess I mean myself) the frame was 3mm too large for the skin to wrap around. so, I started over and saw those rectangular shapes on the nose that had a much too prominent presence, in my eyes.
So, back to the drawing board and a reprint for the 3rd time. And this one is what you see here.

The rest of the pictures is below, after the jump.
26 August 2013
ALT 1977 1/400 [17]
Yesterday I have finished the SCA. I scratch built the main gear and all its doors. Apart from the brass tube for placing the aircraft on its rod, this aircraft is completely made of paper. And I must say, I take my hat off for those who build these kind of paper models more often. I find them quite hard to do. Not so much the building itself, more the effort being put in keeping it flush, straight and paralleled. the shuttle is quite easy, since the wings are stubby and it is a very compact shape all together. But this is the fourth winged aircraft I have done and I still think they're a tough cookie to get right. Especially in this scale. It might be less hard when you build this model in its intended scale.
Anyway, here is the SCA, taking off. Now it's the shuttle and two more T-38's.
I already have started on the shuttle and the third version is very promising. (Of the two earlier versions one accidentally was out of scale and the second version had very destinguished rectangles on the nose, that might be there ( right at the place where the star trackers are and where the small black line crosses the space-going shuttle's noses) but in an 1/400th version would be very hard to spot, s I removed them from the third printout. More on that tomorrow.
Now here's some pictures of the SCA (more after the jump).
Thanks for watching!
--PK
 |
| 905 awaits the Enterprise. |
24 August 2013
ALT 1977 1/400 [16]
And there are the wings. Up next: finishing touches, main gear and wheel well detailing and the shuttle struts. That's for tomorrow.


22 August 2013
ALT 1977 1/400 [15]
The port wing is here.
I didn't manage to get it all finished in one go, but two is not a bad score anyway. The first part concerned the wing itself. the wing root, the detailing in the flap wells and the slat wells and the slats and flaps themselves as well. I finished the first session with the engine mounts.
Second day was mainly the flap levers and the engines. The tiny bits.
Here's the final result: two full wings.
After the jump there are ten pictures of the construction. Enjoy and thanks for visiting!
I didn't manage to get it all finished in one go, but two is not a bad score anyway. The first part concerned the wing itself. the wing root, the detailing in the flap wells and the slat wells and the slats and flaps themselves as well. I finished the first session with the engine mounts.
Second day was mainly the flap levers and the engines. The tiny bits.
Here's the final result: two full wings.

After the jump there are ten pictures of the construction. Enjoy and thanks for visiting!
18 August 2013
ALT 1977 1/400 [14]
And here's the finished right hand side wing.


It might not be fully accurate, but it gives an idea of the mechanics and it just looks nice and busy...
More photos after the jump and more in the days to come.
17 August 2013
ALT 1977 1/400 [13]
Back on the build!
I started redoing the wings of the SCA/ I wasn't all that pleased with the colours and so I used some digital print ground to let the ink come out more on the silvery paper.
I also scavenged some good-looking bits from the old wings, since I wouldn't use those any more anyway. having gone through these motions before made it somewhat easier to do them this time. Wing 1 almost ready, I started on the other one, the struts for the open slats and the remaining engine of the right wing will come soon.
Here's some stuff to look at. More after the jump.

04 August 2013
Still here - but no paperwork!
Hi there!
Lots of stuff going on here. Mainly job-related. We've filmed a classical chamber music festival and that has kept me off the model building. Besides, we're in the middle of a heat wave here so that also is not a very stimulating factor, really.
However, I can say that I'd soon like to pick up where I left. So please be patient a little longer, I'll return to the SCA wings shortly.
--PK
21 July 2013
Hi there!
Just got back from a week spent in the Vosges, France. Not a second was there any paper stuff on my mind. Very calming for a change. I read a lot, enjoyed doing nothing and even less, and did a lot of photographing. I wanted to get to know my new camera (A Panasonic Lumix LX7) a little better and even though I learnt a lot, I still have to learn a lot more to use this little gem to its full potential.
So no paper stuff for a change but two pics of two very pretty animals I met there. Both were approached very carefully and slowly and in the end they let me get very close to them. I didn't even use the zoom in these pictures. As for their size, I presume everyone knows how big a dragonfly is, the lizard was about 20, 25 cm from head to tail.


I made 3 cropped images for you to show the level of detail, I won't put them here in full size, of course. They are to be found after the jump.
Soon there will be some new paper building sessions taking place, I guess. Now it just is a little too hot for building. See you soon!
(and don't forget to look after the jump)
06 July 2013
Still here
Hi y'all. Just to let you know I am still here, but I decided to take a little break. Busy times at work and in need of some time off. There is a lot going on in my head but not that much at the cutting mat. Guess it has to be like that for a little while. I'll be back soon, that's a promise.
Have a great summer (or winter), I will return before you know it.
--PK
Have a great summer (or winter), I will return before you know it.
--PK
28 June 2013
ALT 1977 1/400 [12]
I am a bit surprised on how slow my progress seems to go. It is like I don't have the energy to start early and go on for more than three hours in a row per day. I still am tired as we speak.
I cannot put my finger on what makes me tired but I guess it must me the sum of a couple of things.
Thing is, it kind of irritates me that it slowed down. I'd like to see this SCA flying. That will happen, no doubt, but not today.
I have worked n the new wings. I always had planned this, and considered the built wing a test to see what I could detail. I added one engine and that is that. it all looks good and perhaps I would have used this wing if it wasn't for the lack of colour. it missed the dark surface area over the wing itself and that definitely needs to be on.
So here's a look at the engine up close (I even made the turbine blades by cutting them loose and curving them slightly) and the new wing after the jump.

23 June 2013
ALT 1977 1/400 [11]
Today I made the base plate. I tried out a couple of sizes but ended up with the biggest one I had. It's about 30x40 centimetres and that is because I want to do the width of the runway on scale too.
I measured out the angle in which the runway would look best and would leave me with some extra room for detailing the surrounding landscape. (Well, its a desert, so there's not much to detail and decorate..) I will make a small tutorial in the tutorial section about how I make this kind of landscape.
Anyway, here's what I came up with.
The SCA and the other hardware still isn't finished but now I have a place for them to go.
More after the jump.

22 June 2013
Kingfisher
So here it is. Johan Scherft's pretty kingfisher. I enjoyed this build a lot. Here are some pictures of it sitting in one of the yuccas in my room. More after the jump.


21 June 2013
Out of the comfort zone: Kingfisher!
In need for a quick result and something else than aircraft and space related stuff, I decided to leave my comfort zone and do something new.
Besides aforementioned tech items, I also really like birds. Not so much that I would go out in whatever weather to seek and find some rare species never seen before in this area, not so much that I can name any bird by its call but enough to have a Peterson's European bird guide close at hand and really enjoying looking at birds.
This one I have seen only once. I was somewhere on a big estate in an area rich in rivers and streams. Out of the corner of my eye I saw a little blueish silvery shape darting over the stream and disappear in the shadows. When I started to look a little better I saw it was a kingfisher. I think it's one of the prettiest birds around and I just adore its colours. The little peeps it makes. And to see it diving for sticklebacks is just fascinating.
Dutch designer and artist Johan Scherft has made a lot of very beautiful and very realistic bird models out of paper, all in 1:1 scale. Some of them he made into kits to sell. Some of those he gives away for free on his website. This kingfisher is one of them. He also has a wren, a goldcrest and a pair of superb birds of paradise available for free download. Check out his non-free models too, they really are worth the (small) price.
Here is where I started with, the rest of today's pictures are after the jump.
 |
| Clearly seen here already is the complex shape of the bird's body part. It needs to be carefully folded and glued, tab by tab. It was recommended to print it on regular 80 gram printer paper, so that's another out-of-the-comfort-zone sensation for me, who builds everything in 200 gram paper. |
16 June 2013
ALT 1977 1/400 [10]
Well, I guess it is possible after all. I wasn't sure whether I could pull off this trick, making slats and flaps on the SCA's wings. But I did.

And although I am always happy when something works out well, I must say I really am quite pleased with the result of today's build.
More pictures after the jump!

And although I am always happy when something works out well, I must say I really am quite pleased with the result of today's build.
More pictures after the jump!
11 June 2013
ALT 1977 1/400 [9]
Today was a good day.
The decision to start from the back to the front and do the middle part last has proven successful.
Today I closed up the main part of the midsection and it all fitted like a glove. I am happy about that. I have to accept the fact that the hull is not as tight as I hoped it would be, this is just not going to be one of my best models. Whatever. I now just keep on going with this one.
Here's the beginning of what I had on my cutting mat a couple of days ago and after the jump you can see the result of today.
 From left to right the hindmost part of the midsection and two appendices, two newly designed middle parts (the parts were extended with the blue-white-red band over the fuselage - and actually could have been joined all together in the end but oh well..) and the front part, a bit with a lot of open spaces in it. The two wishbone shapes are the front ends of the wing roots.
The decision to start from the back to the front and do the middle part last has proven successful.
Today I closed up the main part of the midsection and it all fitted like a glove. I am happy about that. I have to accept the fact that the hull is not as tight as I hoped it would be, this is just not going to be one of my best models. Whatever. I now just keep on going with this one.
Here's the beginning of what I had on my cutting mat a couple of days ago and after the jump you can see the result of today.

08 June 2013
ALT 1977 1/400 [8]
Yesterday I finished the tail section. Just some small stuff like the tail stabilizers and the APU exhaust part. Now I am about to tackle the midsection with the wings and the engines and the landing gear.

To prepare myself for that and just to get a small, quick and satisfying result from an inbetweenie, I decided upon trying to make one of the T-38 Talon trainers which accompanied the SCA and Enterprise on their test flights. NASA uses a whole fleet of these versatile jet aircraft and although its original design, the Northrop F-5, stems from 1962, the USAF (and NASA) still fly the trainer version today.
Richard de Vries, who redesigned the SCA from Canon's 747-400, also made an 1/72 model of the T-38 Talon in NASA livery. I reduced it to 1/400 and gave it a try.
Lots more pictures after the jump.

To prepare myself for that and just to get a small, quick and satisfying result from an inbetweenie, I decided upon trying to make one of the T-38 Talon trainers which accompanied the SCA and Enterprise on their test flights. NASA uses a whole fleet of these versatile jet aircraft and although its original design, the Northrop F-5, stems from 1962, the USAF (and NASA) still fly the trainer version today.
Richard de Vries, who redesigned the SCA from Canon's 747-400, also made an 1/72 model of the T-38 Talon in NASA livery. I reduced it to 1/400 and gave it a try.
 |
| In case you missed it, underneath the cutter there is a very small cone. That's the pointy end of the T-38's nose cone. |
05 June 2013
ALT 1977 1/400 [7]
As I maybe have told, earlier on in the building process, I had two ideas for displaying the SCA and Enterprise. One in flight, during the release of the orbiter and one at take off. I still didn't know which one I would want to make. As you can see, I now have.

I asked my friend Zoltan about his opinion on the matter and he just gave me the last little encouraging push of what perhaps already was taking shape in my head all along. It indeed is a very interesting display, it shows the complexity of the wings of the 747, with all the flaps and slats opened. It has a fully deployed landing gear that makes the model more interesting to look at. Especially in 1/400.
The main advantage of this display option, however, is the end result is much more stable. It doesn't "fly" high above the frame to which it is attached on a thin brass rod. And it lacks the complexity of two aircraft "hovering" loose above one and other. It would make for one very wobbly, unstable display. The main disadvantage is the big amount of extra work on a very tiny scale I have to do: the landing gear and the slats and flaps on the wings. Oh well, I think I can handle that now, after making the nose wheel.
more after the jump.
02 June 2013
ALT 1977 1/400 [6]
I have finished the forward section of the SCA. I decided to leave the wing root section for later and started with the tail section. This is near finishing, it just needs the APU tail cone and the tail planes.
And still I am not really happy about how the model turns out.
It's not the model itself, the fit is good and the parts all are well designed. It is mainly the size I work in and the amount of parts that make up the hull. The more segments, the more seamlines you get. And all the lines look equally visible in 1/400 as they are in 1/144. It is just that in 1/144 the seams are wider apart and the parts all are bigger. This results in a smoother looking surface, but not in 1/400.
I guess I will just go on with this build now just to see what the end result will be. Maybe after finishing, it won't look too bad all together.
I sure hope so.
Here's the batch o' pics for today (more after the jump):
 The 'bulge" is attached to the forward section, and I added the structural reinforcing where the front attachment point of the shuttle is situated.
And still I am not really happy about how the model turns out.
It's not the model itself, the fit is good and the parts all are well designed. It is mainly the size I work in and the amount of parts that make up the hull. The more segments, the more seamlines you get. And all the lines look equally visible in 1/400 as they are in 1/144. It is just that in 1/144 the seams are wider apart and the parts all are bigger. This results in a smoother looking surface, but not in 1/400.
I guess I will just go on with this build now just to see what the end result will be. Maybe after finishing, it won't look too bad all together.
I sure hope so.
Here's the batch o' pics for today (more after the jump):

26 May 2013
ALT 1977 1/400 [5]
I have started over with the 747. It is a slightly better fit than my first try, now I kind of know how I have to work the separate pieces to get them tighter together. I guess I have to acquiesce about the fact that it will not get it any better. Might be the paper, the size or something else I don't have figured out yet that makes it more difficult to get it all really nice and flush.
So, although not for a full 100%, I can say I now am more satisfied with how the parts come together than before. It still is hard to get it right, for instance, the outlines are hard to see. I try to discard the gluing tabs for a more flush skin and that is not the easiest job with this shinier type of paper without really dark outlines around the parts. I use internal gluing strips to line all rings up and the nose part is particularly difficult to get right. I guess it's due to the downsizing and the perfect fit it might have in 1/144, which is its original scale. The smaller, the bigger the deviations and the harder to get it snug and tightly fitting together.
Comparing it to the previous attempt, the nose almost looks just as rough but the overall shape of it is better. I am especially pleased with the cockpit windows. These were kind of recessed in the first version, now they are much more flush. And although the blue-white-red band across the nose is not aligning perfectly, a little further on it gets better and if this continues looking like this up to the tail I think I shouldn't complain.
So here's some picture stuff to look at. At the moment I am really busy with job-related stuff so i have to take this build slow. But I hope to update regularly. I'll keep you posted!
--PK
More after the jump.
So, although not for a full 100%, I can say I now am more satisfied with how the parts come together than before. It still is hard to get it right, for instance, the outlines are hard to see. I try to discard the gluing tabs for a more flush skin and that is not the easiest job with this shinier type of paper without really dark outlines around the parts. I use internal gluing strips to line all rings up and the nose part is particularly difficult to get right. I guess it's due to the downsizing and the perfect fit it might have in 1/144, which is its original scale. The smaller, the bigger the deviations and the harder to get it snug and tightly fitting together.
Comparing it to the previous attempt, the nose almost looks just as rough but the overall shape of it is better. I am especially pleased with the cockpit windows. These were kind of recessed in the first version, now they are much more flush. And although the blue-white-red band across the nose is not aligning perfectly, a little further on it gets better and if this continues looking like this up to the tail I think I shouldn't complain.

So here's some picture stuff to look at. At the moment I am really busy with job-related stuff so i have to take this build slow. But I hope to update regularly. I'll keep you posted!
--PK
More after the jump.
15 May 2013
Mir 1/400 [14]: Finished (finally!)
Well it took some time to show you all but here is Mir and Atlantis in the process of undocking during STS-71, the first visit and docking of a shuttle to the Mir space station and in some way the birthplace of the ISS. Not so much to add in words, more to add in pictures. Have fun with them!
And for reference, here's the original photo taken from the undocked Soyuz:
There are more photos of my model after the jump. This build was part of a mini group build, to see more of it, please take a look at this page on Paper Modelers.com where you can see the build of my good friend Zoltan Mertusz, who also made a very beautiful 1/100 rendition of Mir, but in a fictitious version, including a docked Buran shuttle (with scratched payload bay!!) and a very fine scratchbuilt TKS module docked to the front port.
--PK
 |
| Atlantis undocks from Mir, the 4th of July, 1995 |
 |
| © NASA |
There are more photos of my model after the jump. This build was part of a mini group build, to see more of it, please take a look at this page on Paper Modelers.com where you can see the build of my good friend Zoltan Mertusz, who also made a very beautiful 1/100 rendition of Mir, but in a fictitious version, including a docked Buran shuttle (with scratched payload bay!!) and a very fine scratchbuilt TKS module docked to the front port.
--PK
Subscribe to:
Posts (Atom)