byline

Paper models, photos and musings of a Paper Kosmonaut

30 August 2011

So... A helicopter for a Fakestok. (3)

As said, there was a helicopter in the planning for this diorama I am making. The Mil Mi-6 (known as "Hook" to NATO-countries) used to be the biggest helicopter around for quite a while in the early sixties.

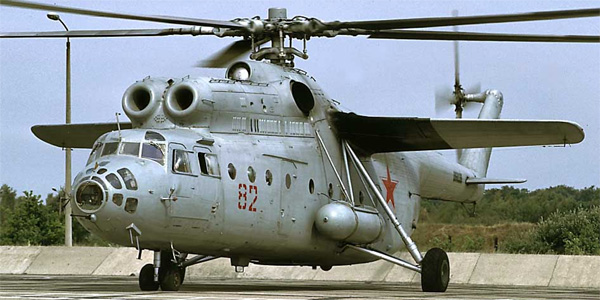
The real thing. (I found this picture on http://www.avionslegendaires.net)


The model I am building was tended to be made in 1/48 which would have ended up in quite a big helicopter indeed. I make it in 1/100, to keep it in proportions and storable on a shelf.
A nice convenience is the Fake Vostok it needs to carry also is 1/100, so it matches. (-;


This big one has no glue tabs. No attached lips nor loose tabs between parts. You got to cut them out yourself. In this scale it is somewhat delicate. I use very small strips to aide the parts with placing and securing them into place. I also do a lot of edge glueing, a technique where you add glue to the rims of the parts and hope the other part will attach to the small surface. Luckily it does, most of the time.

This kit is hard, very oddly shaped pieces and with just a textual assembly guide companying the parts. Especially in this 50% reduced scale, it is amazing how well they fit and fall into place. Only here and there, due to the thickness of the paper I prefer, there are some minute gaps, easily filled with pieces of rest paper or a dab of CA glue.


The shape of the Mi-6 is very rounded, so there's a lot of shaping between the placing of parts. In the description it says the model is tending to be a tailsitter but since I will show it in flight there won't be any problems foreseen there.


However, progress is slow due to the daily activities of PK. Nonetheless, the nose is ready.
Here are some first pictures.


Well, here we go...


A flat roof? Doesn't seem right.

Roof part bent and lo, it looks well again!

The inside looks like a mess but it works well.
Next updates will be well into the weekend, I am afraid... First there's a documentary to be filmed.

28 August 2011

ISS and Endeavour (4) - Will the fun ever stop?

Worked almost all day on the leftovers I had to add to the station so now all I have to do is the last module in this configuration, Rassvet. And that will be out in a couple of weeks, I read. That's great.
Those leftovers, however, that took me all day, mount up to three smaller-than-stamp-sized bits with even smaller bits attached to it. ESP-3, an experiments panel bolted to the port truss, AMS-2, the long awaited spectrometer next to ESP-4, placed on the starboard side of the truss and some additive bits and pieces to the Quest airlock.
Some parts were so small, I couldn't include them in the build. But then, in 1/400, there's only so much you can do. 
What's that?

Oh, it's a 1/400th Alpha Magnetic Spectrometer!

A pair of tweezers with a...

Ah yes, it's ESP-3, I would recognise it with my eyes closed!

AMS-2 mounted on the truss

And ESP-3 on its place opposite the AMS on the other side of the truss
Slowly but surely this build nears its end. I started this somewhere in January, February, if I'm correct. So it's quite a long journey up til now. I have been having a lot of new ideas in the last weeks and I want to build them all, so as soon as this is finished,  
In the meantime I have started on the Mil Mi-6 helicopter for my Fakestok display. More of that in the next post.

26 August 2011

ISS & Endeavour revisited - Not finished yet!

I just don't like unfinished business. It keeps gnawing away at the comfy chair called "next projects".
In the spring I spent a lot of time building the ISS with Endeavour, which wasn't launched at that time. I wanted to depict the shuttle in the last manoeuvring moment with the station, when leaving, making  a final loop around the station. In reality this didn't actually happen.
The shuttle left by just removing itself backward from the ISS and then after a couple of hours and hundreds of miles, it returned to test STORRM, a new rendez-vous system intended for NASA's new deep space capsule called Orion.
Anyway.
I decided to redo the display into what actually did happen an was quite a historic event, in my opinion. While the shuttle was docked to the front Pressurized Mating Adapter, a  Soyuz was leaving. Soyuz TMA-20 took off with three crewmembers, including Paolo Nespoli, who made a couple of dozen impressive shots of Endeavour docked to the station.
All it took was building another Soyuz and to arrange it on a new frame. So that's what I did.

Today I made Soyuz TMA-20. After the giant scale of 1/48 with Juno it took some time to get used to this small scaled stuff again. But anyway, here is what I came up with today.

Engine section and capsule in progress (or rather Soyuz - heh heh heh)

The biggest parts are together, now the eye-tiring minuscule parts.

Soyuz TMA-20 on its rod.

The docking probe is made out of the head of a pin.

Just one phalanx long and the smallest shape I intend to build. Ever. Not.

The display now. Backdrop, the Rassvet module and some pallets on the ISS still to come.

In the coming weeks I'll be busy with this and maybe my first helicopter. We'll see!

21 August 2011

Juno (5) Finished!

Well it took me a long time, but I finally am here to say Juno is finished and ready for a life on the shelf. The detailing took a long time, longer than I expected. Looking back I could have made things easier on myself by taking less experimental paths to the end result. I could have done it the easy way but I wanted to try things out. So there. I did it to myself.
However, it was an extremely fun build. The learning process on the background, getting to know what the use is of every thingamabob and watchamecallit is a fun thing on the side. I used some non-paper materials of course, the struts are all made of copper and brass, I used some razor saw blades inside the PVA structure and for the toroidal antenna at the bottom deck I used the spark wheel of a lighter.

Now it is time to show some pictures.

The doodads all in place.

The struts are asymmetrically placed underneath the PVA's

Bottom deck with RCS thrusters, Jiram, engine and toroidal antenna
The end result! "wingspan" is around 45 cm.


Junocam is made from a silicate ball with a dab of clear gloss paint

Magboom and PVA


Together with its predecessor Voyager, also in 1/48. Man, this is a big probe!
Well, so far as for Juno. Up next will be my half-pirated Fakestok, for which I am going to make a nice helicopter. At least, that's what I have planned for now.
For today, this is PK signing off, taking a little rest.

*edit*
Wahey! 1001 views in five months! there actually are people looking at my builds here.
The detail kit for this model is now up for download at Jonathan Leslie's Lower Hudson Valley paper model vault. (scroll down to Yogi's original model, you'll find mine as an addendum.)

20 August 2011

Juno (4) it slowly comes together

Well, it's been a while but hey, its vacation time.
In the spare time inbetween doing nothing and doing jobs around the house I found some time to work on Juno.
The solar panels finally are satisfactory enough to leave another try alone. I took a lot of time to get them where I am now but still they can be better. I just can't be bothered to redo them for a fourth time. Call me lazy, I don't care.
I worked hard to get all the thingamabobs, watchamecallits and doodads in place and looking the part. Everything is wrapped in MLI so I used a lot of chocolate wrapper to get all the thingies in silvery foil.
I still have to do the underside of two PVA wings with circuitry and as we speak I am doing the hinges on these two PVA's. The sides are reupholstered in silver foil and I made the three struts with brass rods and some solder I grinded down later to give it an all smoothed out look. After a coat of flat aluminium it looks swell. Even though this is resized to 50% it still is a big mother of a probe. 
Now with the finish in sight it is giving me back some more space for next projects and thos I already started and yet have to pick up again. There's some stuff I have to add to my 1/400 ISS model and I am already starting to look back to my Fakestok diorama I started. After that, there's plenty of possibilities but there might be another helicopter-involved diorama coming up.
later more on that, First some progress pictures of Juno.

Two PVA's left to finish. To give a sense of the size: see my huge hand.

With the HGA on top it sure starts to look like the real thing.

The thingamabobs, watchamecallits and doodads. There's more to come!
Oh yeah: before I forget: The detail kit will soon be available at Jon Leslie's site.

07 August 2011

Go Juno! (2) - now in 1/200

While watching Juno's launch yesterday I was impressed by the beautiful Atlas V 551 that brought the probe into its big orbit. The five boosters around its base looked good, much better than the smaller Atlas V 401 I made in 1/96 a while back.
For those of you not familiar with the Atlas number designations: The first 5 stands for the diameter of the shroud in meters (the other option is 4.). The second 5 is the number of solid rocket boosters at the base of the core (minimum is 0, max 5) and the third number stands for the number of engines on the Centaur upper stage. (actually this is always 1, there is an option for a double engined Centaur, but is never has been ordered up 'til now. 

When building something that takes a long time I sometimes find it necessary to do an "inbetweenie", a little quick build of something relatively easy to get some result in a short time. So I decided to do this Atlas. that way I also remained on topic.
I got my hands on some nice copper coloured paper some time ago, Perfect for the core stage of an Atlas. Printing was no problem, neither was glueing.
All in all it took six hours from start to finish to build this little model. Although, little? even in 1/200 it still is quite a big one. So after building I was hesitant for a moment to let go of the coppery colour but hey, a launched rocket is frosted. So I took out the paint (Tamiya flat whiteXF2) and painted the upper part of the core in flat white, added some very tiny paper cuts for icy flakes falling off the hull and even added some plaster powder. the result is quite good.

The main ingredients are here. For more pictures, click 'more...'

05 August 2011

Go Juno!

This afternoon Juno has been launched. After a postponement of about 50 minutes the Atlas V 551 lifted off the pad and several minutes later stage 2, the single engined Centaur took over and kicked Juno out of Earth orbit.
Not long afterwards Juno was released, right above Australia, to let Juno coast away and open its solar panels, while spinning at 1 RPM. In about a year we'll meet again with the big probe, to give it its slingshot towards Jupiter. The journey will take five years and has begun.
I still have to finish the model, but for now: Go Juno!

There she goes!
© NASA