While Endeavour has left the station and I am waiting for the Hi-Res photo's of the ISS with Endeavour docked I continued on the shuttle stack for my STS-1 diorama.
Columbia is finished and stacked with its ET and booster set. The rear umbilicals of the shuttle do not line up exactly with the place they should but they keep the stack very snug in place. No risk of falling over there.
On with the crawler. This massive machine with huge tracks (each track shoe weighs a just little less than a ton!) has a very ingenious system of hydraulics which keep the MLP with the shuttle at an angle of 0º during the climb of the slope. With a speed of around 1,5 kilometer per hour the whole combination is not that fast. For smoothing the ride the trucks can steer like normal wheels can. It is not just the caterpillar or tank-method of keeping one trackside still, move the other to accomplish a change of direction. It would be causing too much vibrations and shaking to the shuttle stack.
The main part is done, I am now on to the trucks, the four parts where the tracks are on. I dabbed a little bit of gloss paint on all the windows to give them a more glassy feeling.
I did some finishing work on the MLP, it has received some fences and a couple of auxiliary cars used for energy supply to the stack and the purging systems.
I then did the stack itself, which now is finished. Columbia is next.
Again, due to the thickness of the paper it sometimes is difficult to get everything right.
So why do i not use thinner paper? Well, mostly I can manage the thick parts very well. In this case, the nozzles of the SRB's were too big in diameter to fit in the blast holes of the MLP. Or the blast holes were too small, whatever. They couldn't join up as they should. But since the whole stack will be shown permanently on the MLP, it doesn't matter. I left them off. No one will see.
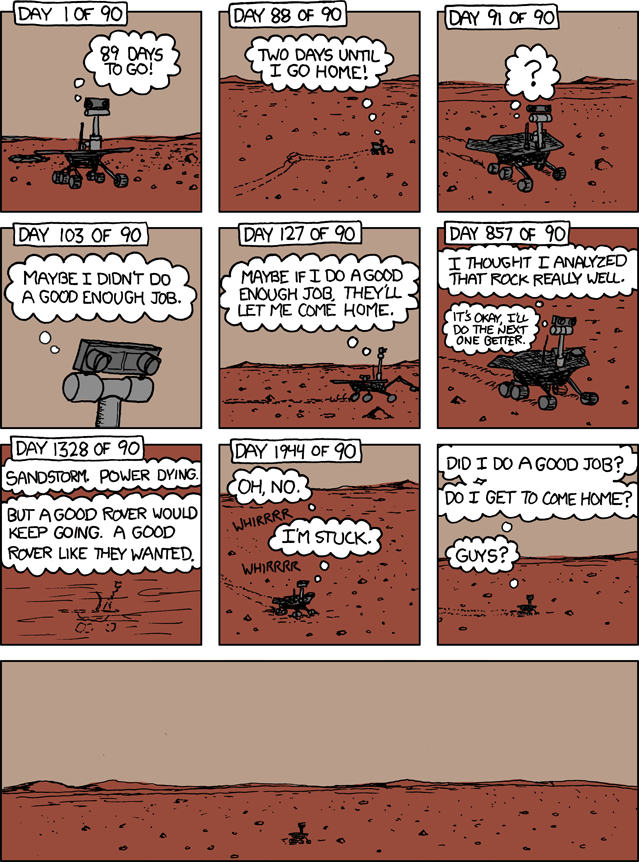
This week NASA announced that it has sent a final radio command to the crippled marsrover Spirit. After six years of struggling around over Mars' surface, Spirit probably has succumbed in the cold Martian winter and went without getting enough power in its solar panels. originally Spirit and its twin Opportunity were deemed to work for three months and whatever would come next was a nice little extra. That nice little extra started about six whole years ago. While "Oppy" happily trotted along on Mars from crater to crater, Spirit had a troublesome odyssey. A constant shortage of power due to dusty solar panels and just not enough sunlight to absorb, Spirit became cripple. First the right, and then the left front wheel too, were ground to a halt by sand and dirt it became a stationary research platform. Unfortunately, Spirit needed more power to survive the winter and went in to hibernation. No response has been heard since then. Now the brave little rover is given up on. One of the coming projects will be a rendition of Spirit, as it is now, at its "base", called Troy. Now I am not an animist kind of person but this little comic grabs me by the throat every time.
image: XKCD
Farewell, Spirit. You did a very good job. Soon I'll try and make a diorama of it.
This was an idea for a model diorama I suddenly got when I came across an unknown and a bit rudimentary Eastern European paper model kit of Vostok. Not the one we all know now, but the one the Soviets wanted us to believe was the real thing in 1961.
At the air show in Tushino that year the Soviets showed Vostok to the international press, dangling underneath a brand spanking new Mil Mi-6 helicopter. It looked like a futuristic craft, a pointy white cylinder with a ring around its end, and in big red letters VOSTOK over the sides.
No one knew there and then it was just the fantasy of Korolyov's engineers gone wild. He ordered this fake model since he really was eager to show and rub in the achievements Vostok recently had made but the military insisted he had to keep the spacecraft itself top secret. So it was decided to take the shroud of the third stage and go Buck Rogers on it.
For years to come the Western observers thought they had seen the real hardware and fantasized about its innards. One of them even suggested an astronaut in a very small return capsule, lying in a prone position instead of on his back. The stabilization ring fooled everyone. However, the antennas were real.
The idea for a more than just "out of the box model" was obvious. So I found a 1/48 model of the Mil Mi-6 helicopter at Ecardmodels.com ($2,50) and wanted to try and combine it with the Fakestok to show the flypass during the airshow.
(For those interested in seeing the actual happening in 1961: here's a Youtube clip:)
Three small Mil-Mi-4 helicopters fly along past the crowd, carrying the three first Sputniks. Then, after a short animation of those and other space achievements, a bigger Mil Mi-6 helicopter comes flying past with the fake Vostok (Восток) spacecraft.
The trouble was, I didn't know the scale of this Fakestok. besides, it was very graini in quality. So I decided on trying to recreate it withanother, real, Vostok model.I took a part of the perfectly modeled 1/48 Vostok of Leo Cherkashyn I then shrunk it to 66% of its original size to get a perfect match. And I did a recolouring (grey to white). Only hard thing is that ring. Perhaps I can use the grainy version as a lead for that.
Now it is scaleable, I can easily resize 'copter and spacecraft to a smaller diorama scale. The idea is to use a runway motif as a base, with the runway lines slightly motion blurred to give the Mi-6 some suggestion of speed.
It might be looking like this when finished. Perhaps I also add some extra effect by making the rotors look blurred. This would mean not adding the actual rotors of the kit but cutting a transparent circle with slightly blurred rotors printed on. The scale in which I want to build it might be around 1/100 but I could be crazy and try 1/144 or maybe even 1/200...
The process of sanding was a bit tedious, it took several takes, refilling gaps and sanding off irregularities.
After that, I drew some lines on the slope to indicate where everything had to go in the end.
The concrete sides were done with acrylic paint and the grass and crawlerpath also got a thin layer of colour as an underlayer to accompany the stuff I threw upon it.
I bought some green grass fibre and very tiny grainy stone sprinkles. Glued it on the base with transparent glue. It kind of looks what I had in mind. Perhaps it needs some more lightening of the crawlerway.
(click this one for bigger)
Anyway, the non-paper stuff is done. Back to paper. The MLP is about to receive its walkways and staircases.
More of that later.
The base has been finished and filled with plaster. My cats were very interested in the process of pouring the plaster in the 'mold'. While it is drying, which, I estimate, might take two days, I am about to start with the model itself.
Now what came first: the chicken or the egg? The Mobile Launch Platform, the Crawler or the shuttle? Well, I don't give a hoot. I start with the MLP, so when I build the shuttle it has something to stand on while I make the Crawler. (Hey - that's good thinking, right?)
Next update will be later next week when hopefully some progress has been made (and hopefully Endeavour will be in space.)
The MLP decks are shaped around extended beer mats on which I use templates to cut out the shapes and the sides. So it will be quite sturdy!