Well, as 2016 draws to a close, it's time for us to reflect a little on what has been this 365 days. For me, it was quite a ride. And not one I enjoyed, to be honest. Neither professionally nor personally. If I had to put it into a single word, I'd say 'miserable'.
Just to top it, last week I unexpectedly had to deal with the fact the documentary film I was working on to realise, was cancelled by the program it was meant for. Two years
of research, interviews and funding requests down the drain. So I am
not in the greatest of moods at the moment. And that's the mildest way
of putting it.
What an awful year this was for music and art in particular and
celebrity deaths in general. There never before has been a year with so many famous people dead. One of my biggest musical heroes,
David Bowie passed away. In the weeks after his death I made a small space tribute
for him. But we also had to cope with the loss of lots of other artists
and well-known wonderful people. It really looks like 2016 was just a
very bad year in general.
Now then, the model stuff. Of course due to busloads of circumstances there were fewer finished builds than I initially hoped for but then again, it also had some highlights. The first one I finished was a diorama of the first landing on solid ground of SpaceX' Falcon9 Full Thrust. Then the earlier mentioned Bowie tribute. Another one of my diorama builds this year became picture of the week on Paper Modelers.com wich also is very nice. I also scratch built a model of the future Ariane 6, which was a little less than satisfactory but a nice proof of concept anyway.
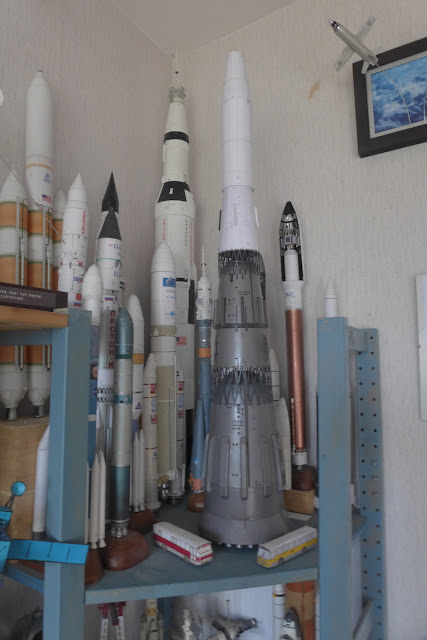
And in August, I brought a couple of my paper models to the National Spaceflight Museum in Lelystad, of which I am quite proud. The N-1 is a beautiful rocket but the build is troublesome and takes very very long. I hope I'll finish it sometime early next year. I want to get it out of my system. I have been working at this model on and off for more than a year now...
Let's hope 2017 is just a whole lot better. I really hope so. For me, my loved ones and of course for you and your loved ones too. Have a safe and joyous new year's eve and see you all in a hopefully healthy and easy-going 2017.
--PK

30 December 2016
19 December 2016
Zil 4906: a little history
Imagine for a moment you’re a cosmonaut. Returning to earth after becoming the first crew to perform a space walk, you you make an unexpected emergency landing somewhere far away on the Siberian taiga,in the middle of the woods, in the snow, with no roads or villages in sight for miles and miles.
That was what happened to Alexei Leonov and Pavel Belyayev. Instead of returning to the wide open steppes of Kazakhstan, they had a bit of trouble* during re-entry and more or less crash landed in the inaccessible woods of the remote Perm region. When they finally were localized, a helicopter dropped some warm clothes but they yet had to wait until the rescuers reached the Voskhod capsule (called a sharik). They had to wait in the sharik for a whole day while knowing they could also be attacked by aggressive packs of wolves (it was Wolf mating season). Finally was an expedition arrived on skis to get them out. After getting there was yet another problem: the sharik could not just be lifted out of the woods so they had to stay there another day. The cosmonauts and the rescuers built a small cabin of chopped wood and made a fire to stay warm.
 |
| Belyayev (L) and Leonov (R) are entertained by their good friend and colleague Vladimir Komarov on their way to the launch pad. Note the special sun visors the cosmonauts have inside their helmets. |
 |
| Rescue crew meeting up with the stranded cosmonauts. (recognisable by their white caps) Photo: Unknown. I presume these pictures from the soviet era are made by 'the state' but if anyone claims this picture, let me know.) |
18 December 2016
ZIL 4906 (3) The cabin is closed.
A little update. I have closed up the cabin. The inner parts of the side walls are on, and this one also needed a good look at the drawings and some patience. But I got there.


The parts close like inverted Super car gull wing doors. A small strip at the underside ot the two parts needs to be folded inward and glued to the low side walls. The point where the fold line is is a little hard to spot, and it needs to be smooth, not razor sharp. It has to follow the contours of the windscreen and the back wall. I made some accessories for the driver, too. More below.


The parts close like inverted Super car gull wing doors. A small strip at the underside ot the two parts needs to be folded inward and glued to the low side walls. The point where the fold line is is a little hard to spot, and it needs to be smooth, not razor sharp. It has to follow the contours of the windscreen and the back wall. I made some accessories for the driver, too. More below.
17 December 2016
ZIL 4906 (2): The first build pictures
Anyway, it really is nice to build another kind of vehicle other than spacecraft for a change. This model really has a lot of parts. Many hundreds. Many of them need to be reinforced with a backing of thick card, like from sturdy boxes. 1mm thick, it makes for a solid build. Since there isn't a real order in which to build this car, I am making this up on the go and I write what I do, to make a decent English instruction manual for this model.
I was a little on a flow so there aren't any very first start pics.


The transmission stick has been given a nice silvery knob because I liked it better that way. The dashboard panels fit like a glove between the outer bulkheads. Great design.
The chair and the couch are too very nice little pieces of work.
12 December 2016
ZIL 4906
Ever since the taigas, tundras, and steppes of the Soviet Union were to be travelled by the military and preferably by car, the military dreamt up the most fantastic all-terrain trucks. All-wheel driven, often six, sometimes eight, extremely rugged, and large. They all were large. Fantastic machines, gas-guzzling giants that took wide and deep ditches like they weren't there, crawled over sand dunes, drove into rivers and pushed over birches like they were matchsticks.
Now let's focus on one of them, because I have started a new model, because I put the N-1 on hold for a while...
 |
| The ZIL E-167, an experimental six-wheeler that was almost unstoppable. And LARGE. |
08 December 2016
Clear Skies, John Glenn.
2016 has claimed its umpteenth famous death.
John Glenn, the last living member of the Original Seven Mercury astronauts, has passed away today. He was 95. A hell of an age considering all the things he did. Glenn served in two wars (WWII and Korea), he broke the speed record on a coast-to-coast high speed flight in an F-7 Crusader, he was the first American to orbit the earth, the fifth human in space, served 20 years as a senator and went back to space at the age of 77, serving as a human guinea pig on STS-95 (His dying age. Isn't that a weird coincidence?) for tests on ageing. He received more awards and honours than most of us would in ten lifetimes.
A real hero.
He was married for 73 years to Annie Glenn.
Now, the Original Seven finally are complete again, somewhere else. They can all don their silver suits again and ride into the sunset. Like the magnificent men they all were.
Ad Astra!
28 November 2016
N1 - Fairing troubles
The last part of the build often is either tedious or hard. Both are true in this build, unfortunately.
The N1's fairing needs to be partially transparent to show all the goodies inside. I wanted to do this with a piece of plastic sheet of some kind. Then the question rose about how to do it. Either a nice window in all of the segments, a little wider than the 'holes' I made in the inner pieces, or say, take the outer fairing and make 50% transparent. Both options have something for them, the first for its aesthetically pleasing appearance, the other for its more educational purposes.
This is what makes it quite troublesome to realise. And as usual, I am not afraid to tell you about my 'failures' (or, more euphemistically, "misadventures in a quest to build a perfect paper model").
 |
| Looking good, eh? No. it isn't. No. really, it isn't. It just is a nice photo. |
20 November 2016
7K-LOK finished
Well, it's about time, right? (-:
Slowly but steadily, I have been working off and on at the 7K-LOK moon Soyuz. There were loads of things interfering with the continuity but nevertheless, here it is. A nice, 7K-LOK in 1/96.
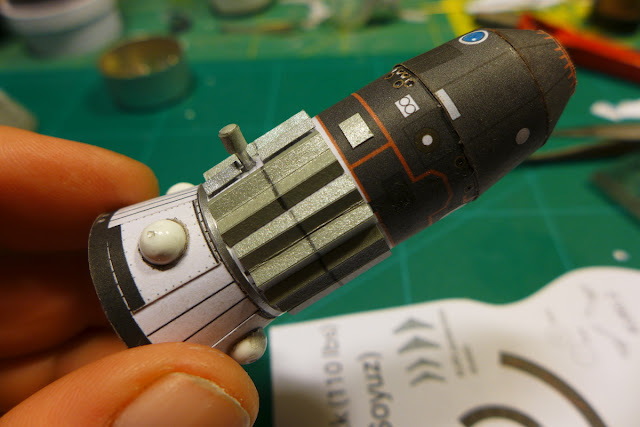
Resuming, I used Alfonso Moreno (AXM)'s Soyuz as a starting point to convert it into this bigger predecessor. Here and there I admit I have taken some poetic license and even some liberties in how things ended up looking, but I tried to stay as close to the truth as possible.
Two things cost me a lot of time: the docking section and the protective collar over the fuel tanks in the aft skirt. Here's the result, the story continues below.

Slowly but steadily, I have been working off and on at the 7K-LOK moon Soyuz. There were loads of things interfering with the continuity but nevertheless, here it is. A nice, 7K-LOK in 1/96.
Resuming, I used Alfonso Moreno (AXM)'s Soyuz as a starting point to convert it into this bigger predecessor. Here and there I admit I have taken some poetic license and even some liberties in how things ended up looking, but I tried to stay as close to the truth as possible.
Two things cost me a lot of time: the docking section and the protective collar over the fuel tanks in the aft skirt. Here's the result, the story continues below.

30 October 2016
N1: 7K-LOK on its way!
Whoopsie. I was on a roll and I forgot to take progress pics. Sorry!
But what is more important: it looks quite good. And that is what counts. I am not making paper stuff for this blog. I make a blog about my paper stuff.
Anyway.
I used an AXM designed Soyuz for the 7K-LOK moon orbiter. (LOK= Lunniy Orbitalny Korabl) I extended the service module and redesigned the longer and wider engine skirt, using the shroud calculator you can find in the sidebar. There was a new engine section needed so that was also made in this same calculator. All cone-shaped rings. Very handy machine. Thanks to whomever designed it. I really love using it.
The upper part of the 7K-LOK is almost similar to the Soyuz. It's just the docking piece on top which is very different. Here's where I am now, some more pictures below.

25 October 2016
N1-L3 in progress
It seems like there isn’t a lot happening at the moment, but it actually is the opposite. It even has been quite turbulent the last two weeks. And not in a nice way, unfortunately.
However, it doesn’t mean there isn’t some time to do a little paperwork now and then. But just a little. Far too little to make a post about. So it really had to accumulate to make a good full post. And here it is.
I still am working on the N1. Such a time consuming build (I started this build mid- November 2015!) perhaps might gets tedious now and then but I got the spirit back a couple of weeks ago. Slowly the thing turns into what I wanted it to be in the first place, albeit as a static model which isn’t made for taking apart to demonstrate. Here's a complete overview in one picture, the rest follows below:
 |
| Yes, you see it right: up on top is the complete LK lander, berthed in its shroud on top of the Blok D stage. |
04 October 2016
The ongoing story of the N-1
Man, this is a troublesome rocket, isn't it? Just like the real thing, I keep struggling with this launcher to make lift off successfully. Still, there are things I could try with it. It just has to be a looker. It's so huge and impressive. And the model is so good.
So today I had a couple of hours of spare time and I had an idea. I first wanted to do it the simple way but that apparently is not the way to go with the N1. So, I cut off about 45mm of width from the piece I printed earlier, which was way too large. I thought it was a waste to throw it all away so now what we're going to do is this:
There is going to be a 4,5 cm wide window all the way up to the escape tower, so you can see what is inside. I also cut open the inner fairings for the Blok D and LK to be shown.
In the copy shop I bought some transparent sheets to go behind the cut-out part of the outer fairing and keep the innards visible.
So today I had a couple of hours of spare time and I had an idea. I first wanted to do it the simple way but that apparently is not the way to go with the N1. So, I cut off about 45mm of width from the piece I printed earlier, which was way too large. I thought it was a waste to throw it all away so now what we're going to do is this:

There is going to be a 4,5 cm wide window all the way up to the escape tower, so you can see what is inside. I also cut open the inner fairings for the Blok D and LK to be shown.
In the copy shop I bought some transparent sheets to go behind the cut-out part of the outer fairing and keep the innards visible.
03 October 2016
There was some stuff happening...
...But it didn't go as planned. The past weeks I have been having a couple of setbacks with paper modelling, It just doesn't go as I want it to go. I worked on Paperpino's rolling cylinder circus, which went quite well but all the little cylinders get either stuck or fall off. Frustrating. Might be because of the reduction in size and/or the paper thickness. Anyway, the automaton itself works fine, the rolling part went wrong. It is a nice thing to build, though. I still want to do some more toy stuff like this.
I started with finishing the N1 today, but now it appeared the very meticulous definitive print I made on photo paper of the white top was much too large. I thought I was smart to use A4 sheets with carefully rearranged parts of the fairing but well, of course Photoshop makes it all larger. Back to printing it on 80 gram paper and test until it has the right size.
The N1 needs a nice tight and semi-gloss fairing to fit the rest. The rocket is quality and needs the top to be that too.
Up next are a few options:
- Something with a what-if I already have in my head for ages. a Diorama with the X-20.
- The fabulous SF Cosmostrator designed by Jason Sutton
- a redo of the most beautiful rocket in the world, the Saturn SA-5 with more detail and better paper
My mind now says Cosmostrator, but perhaps it will be something else. I have to buy some shiny paper for it, .
Hopefully, there will be something on the cutting mat soon. But there are a lot of things going on here, mostly private stuff, which might cause me to take it all a bit slower and it might take a little more time until I am back model making.
I saw a peak of people visiting my blog because of Rosetta and Philae's mission and final reunion on the surface of comet 67P this week. Nice to see there is interest in such missions. I also think ESA did a tremendous job keeping the public interested in the mission by making these wonderful cartoons about their journey and the progress they made in investigating the comet, and of which the last one which also made my eyes a little misty:
Both probes - and ESA - did a great job.
Well, see you all soon.
--PK
 |
| So much fun to make, yet still not working... |
I started with finishing the N1 today, but now it appeared the very meticulous definitive print I made on photo paper of the white top was much too large. I thought I was smart to use A4 sheets with carefully rearranged parts of the fairing but well, of course Photoshop makes it all larger. Back to printing it on 80 gram paper and test until it has the right size.
The N1 needs a nice tight and semi-gloss fairing to fit the rest. The rocket is quality and needs the top to be that too.
Up next are a few options:
- Something with a what-if I already have in my head for ages. a Diorama with the X-20.
- The fabulous SF Cosmostrator designed by Jason Sutton
- a redo of the most beautiful rocket in the world, the Saturn SA-5 with more detail and better paper
My mind now says Cosmostrator, but perhaps it will be something else. I have to buy some shiny paper for it, .
 |
| The Cosmostrator. It's the iconic rocket from an East-German/Polish SF movie from 1960. |
I saw a peak of people visiting my blog because of Rosetta and Philae's mission and final reunion on the surface of comet 67P this week. Nice to see there is interest in such missions. I also think ESA did a tremendous job keeping the public interested in the mission by making these wonderful cartoons about their journey and the progress they made in investigating the comet, and of which the last one which also made my eyes a little misty:
Both probes - and ESA - did a great job.
Well, see you all soon.
--PK
11 September 2016
Ariane 6 #2: Finished. Kind of. More meh than yay...
Well after such a rant about disliking a certain rocket it's time again for some paper model stuff. I started on that Ariane 6 a week or so ago and well, I have finished building. I am only partially satisfied with the outcome, I see it as a proof of concept and a fun scratch build and I have indeed proven to myself a couple of things in measuring and scratch building. I also learnt some more about having to be even more precise about placing stuff and well, keeping my hands clean. It has not become the most spotless of models, I am afraid. I think in the end I had lost my patience a little, wanting it to be finished, perhaps I should have left the model alone for some time but well, the impatience made me do it. Blame me. I don't really care. I will share it because I want you all to know that I sometimes make a little mess and that it's not great and all the whole time. From a distance it still looks nice anyway. (-:

My problem was mainly with the boosters; the aligning of the cone with the straight hull was off because the curvature of the transition was too big. This led to a banana shape. It doesn't show that much but too much for my liking. I know how to change it but I couldn't be bothered with this build. Proof of concept. Also the aligning with the core was hard because I didn't put any marks on the hull beforehand. This led to some readjustments and tearing of paper. It was an easy repair but it left its scars. Furthermore, I got some blemishes here and there I couldn't get rid of. This was at a moment the core already was in a too far advanced state to tear it apart easily so I let it be. Proof of concept.

My problem was mainly with the boosters; the aligning of the cone with the straight hull was off because the curvature of the transition was too big. This led to a banana shape. It doesn't show that much but too much for my liking. I know how to change it but I couldn't be bothered with this build. Proof of concept. Also the aligning with the core was hard because I didn't put any marks on the hull beforehand. This led to some readjustments and tearing of paper. It was an easy repair but it left its scars. Furthermore, I got some blemishes here and there I couldn't get rid of. This was at a moment the core already was in a too far advanced state to tear it apart easily so I let it be. Proof of concept.
10 September 2016
Here's a little rant about SLS, the whitest elephant in the room.
 |
| SLS in an earlier livery. © NASA |
Now before I go on, Here is a recent and interesting article on Arstechnica on the SLS.
And another one.
And here's a shorter one on NASAwatch.
Further below, I will have a nice personal rant about the SLS and its predecessors to get some stuff off my chest.
03 September 2016
Empty shelves! Quick! Make something new!
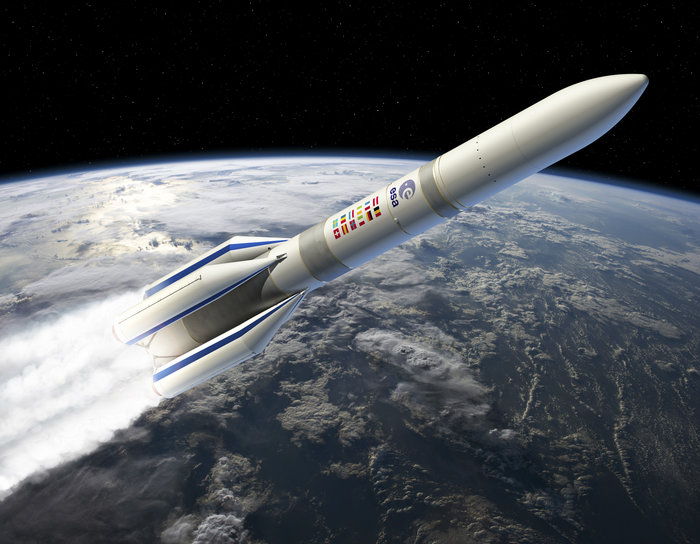 |
| Artist's impression of the Ariane 6. I don't think they'll leave those sporty stripes on the boosters. It surely will save a couple of kilos in weight, leaving them off. Unless they are of course go-faster stripes. (Picture: © esa) |
But Arianespace just wants it to compete with SpaceX. And that race they will not win, I am afraid. It is perhaps a good rocket, proven technology and all, it might perhaps have a good reputation. But it won’t ever be as cheap as a Falcon9. (And although SpaceX have had a major setback with that F9 blowing up on the pad the other day, I think they'll recover reasonably soon. I really hope they will..)
 |
| On the left, Ariane 5 with the two previous incarnations of the Ariane 6. Firstly, the PPH version, a solid rocket first stage with added boosters of the same type and a liquid second stage. Secondly, the newer Airbus-Safran proposed liquid fueled varsion with two and four boosters. This variant eventually has evolved into the definitive version on the first picture. (picture: © esa) |
The Ariane 6 has been going through a couple of big transformations. There is one model available of the Ariane 6 at Aries Space Models, by Erik te Groen. But that one is of the previous design configuration. These A62's and A64's had their booster cones like little stubby pencils pointing up into the sky, while the newer, definitive version has its booster cones pointing towards the hull, like the Ariane 5 has. Further has the fairing been redesigned to be flush with the fuselage. So that is why I now am kind of scratch-building it.
Using the measurements of the Ariane 5, which has the same diameter, I used a couple of pictures of the A6 launcher to make the different parts of the hull. The engine compartment is very different form the Ariane 5 and will need special attention. I'll make my own version of the Vega first stage including engines and all for the booster rockets and I’ll use my own designed Ariane 5 fairing on top.
But I won’t make it into a 100% realistic model, because it still has to be built and presumably is still subject of change. I intend to make it look like a 'show model'. Nice and shiny white contrasting with grey. So super gloss white photo paper combined with the dark grey fuel tank insulation parts. No mission logos, no flags of ESA member states and no ESA logo. And also no separable stages. So that makes this one a relatively easy build. But nevertheless, like I already said, looking quite awesome.
28 August 2016
Rockets to Lelystad!
So today was the big day, a bunch of my paper model rockets were to leave for the Space Museum. After a a smooth and quick one-and-a half-hour drive we (my girlfriend, a good friend of ours and yours truly) arrived at Lelystad airport, where the Aviodrome is, in which you also can find the National Spaceflight Museum.
The rockets I lent to the museum were packed in boxes, just about the right size and secured with some tape to avoid shaking. The big ones were partially disassembled and laid on foam rubber mats. They all survived the journey although I had taken some glue along with me, just to be sure, in case of a small repair. I asked my GF to take some photos of the proceedings.
The rockets I lent to the museum were packed in boxes, just about the right size and secured with some tape to avoid shaking. The big ones were partially disassembled and laid on foam rubber mats. They all survived the journey although I had taken some glue along with me, just to be sure, in case of a small repair. I asked my GF to take some photos of the proceedings.
 |
| Yeah. Cat food boxes. They actually were great in doing the job. Luckily it didn't rain. At least not when I was outside with the lot. |
12 August 2016
Rocket revue!
Hi friends.
Take a good look at these rockets. All of them are in 1/96 scale:
They will be leaving my house. All of them will be moving to a new home:
The Dutch National Museum of Spaceflight in Lelystad!
I already have two models there, the Nationaal Ruimtevaartmuseum (NRM), the Curiosity landing diorama and the first version of the Falcon9. Now these babies are going to join the rocket garden of the museum, so lots of people can look at them and hopefully will be pleasantly surprised when they find out they’re made of paper. I will describe them all in more detail below.
Take a good look at these rockets. All of them are in 1/96 scale:
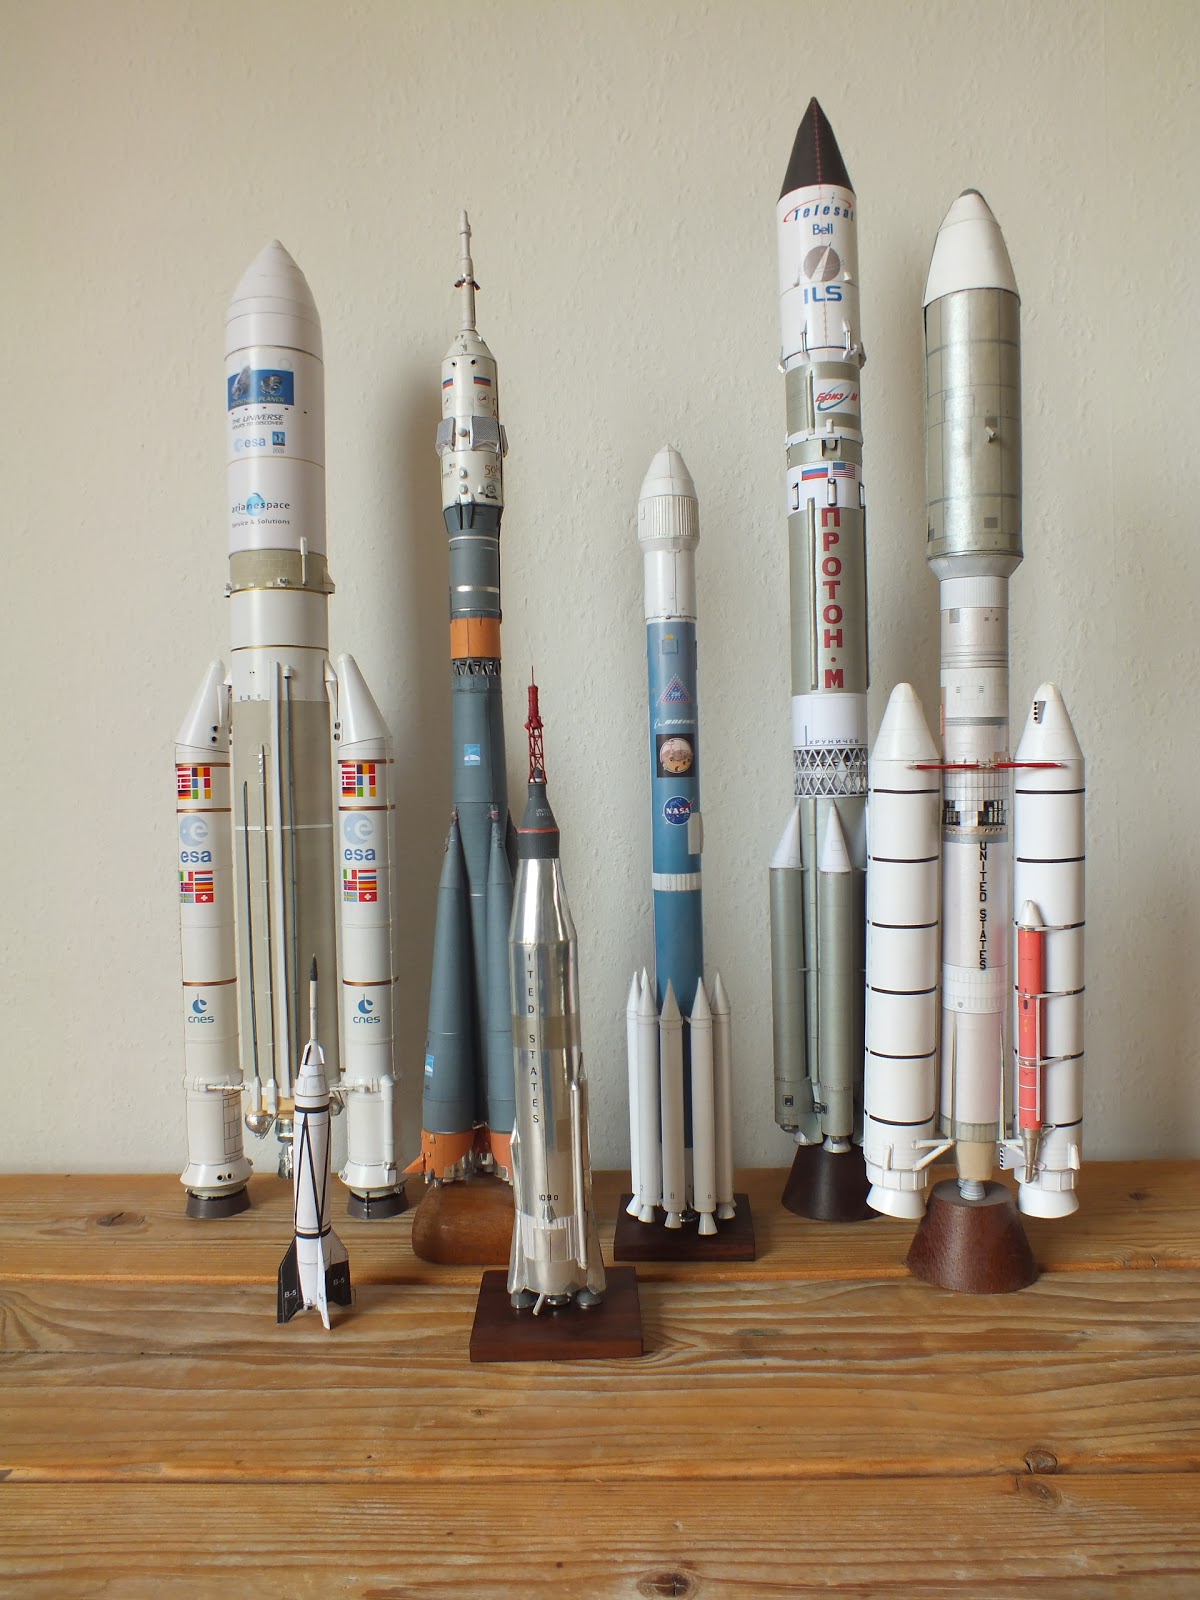 |
| Left to right: Ariane 5, Bumper-WAC, Soyuz FG, Atlas, Delta II, Proton-M, Titan IIIe |
The Dutch National Museum of Spaceflight in Lelystad!
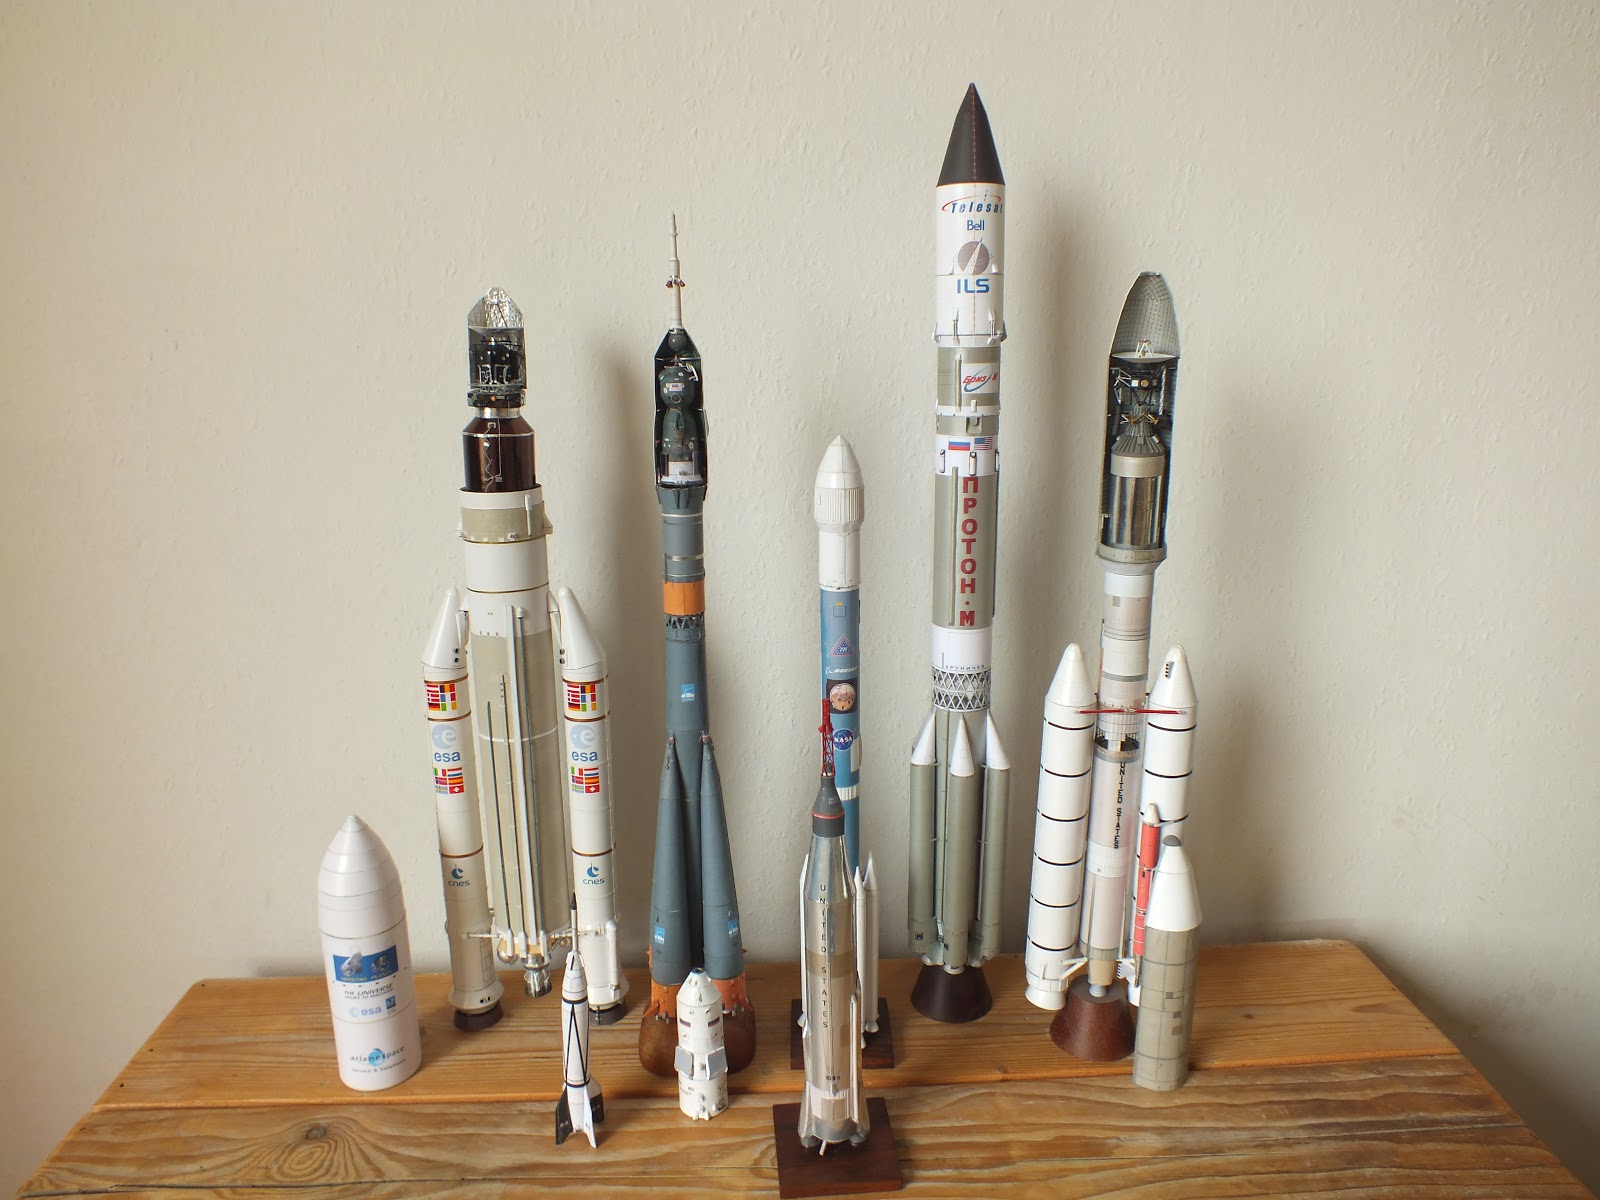 |
| The Ariane 5, Soyuz and Titan have their payloads displayed. |
25 July 2016
That's a nice surprise!
This weekend when I visited the Papermodelers.com forum I was pleasantly surprised to find my diorama of Thunderchild and the Mars Tripods to be Picture of the Week. Thank you, guys. I really was smiling all day.
And also congratulations to Eatcrow, who won the other POTW for his amazing Captain America figure.

At the moment I am doing some work on an older model, the Proton-M, which still needed a decent fairing. Why, I'll tell you later this week.
See sou soon,
--PK

At the moment I am doing some work on an older model, the Proton-M, which still needed a decent fairing. Why, I'll tell you later this week.
See sou soon,
--PK
22 July 2016
Pickin' up the pieces: the N1
I don’t like unfinished models. They seem to beckon me from the shelves, demanding to be finished. The one I heard beckoning the past few months was specifically poignant. Because of its size. So, since I have the feeling my energy has returned, I decided it was time to tackle the N1 again.
There apparently were a couple of small “errors” when I left this build and I was too frustrated to continue at that time. Scratch building is quite intensive and sometimes leaves me no choice but to abandon a build temporarily, especially when other, real life stuff is also getting more demanding. In such cases I always try and pick up the pace with some easy models or just a completely different project.
Anyway, clearer skies now made room for more creativity again and so I found myself back at the LK3 moon train.
Where were we? We had a completed N1 launcher. Three huge stages with loads of engines. After that, I made a top tank dome, based on the second stage dome and created a loose top part for the LK3 fairing. Inside the fairing, a transition was placed to accommodate the Blok G stage, which would give the LK3 a translunar insertion boost. An inner fairing was made for the Blok D stage, a rocket engine on an open truss structure which was attached to the upper part of the moon train: the LK lander and the 7K-LOK Soyuz spaceship. The whole build starts here and continues from there.
 |
| This is what I am working with now. The silver / black part is new. |
10 July 2016
Thunderchild (7): The diorama
As I promised, here's the finished diorama.
I already did some preparations beforehand. The hardboard plate was painted in blues and whites, simulating the wake of the ship with white and in darker blues some depth differences in the water. Perhaps it is too blue for an estuary, it perhaps should have been muddier in colour but hey, it’s SF, fantasy and I like this colour. It contrasts nicely with the orange fire cloud of the hit tripod, too.


I use transparent acrylic paste which dries hard as rock to make water surfaces. It’s milky white when applied, but dries 100% transparent. I used the original glass plate between the acrylic paste layer and the underground. It gives the diorama just a little more depth, literally. Just the tiny 4mm between the acrylic layer and the painted bottom makes a big difference.
I already did that once with the Apollo after splashdown pick-up diorama and that had a nice result. You can add stuff below the glass plate, for example.
Anyway, Paste applied, spread, moulded with flat brushes, let it set a little, moulded it again, making the structure more refined for the scale, and after drying, adding some white paint for the waves, white heads, wake and stern wave. In fact I used a colour called “arctic” which has a whiff of blue added because pure white is too white in this scale I think.
I explain the process of how to do a water diorama more elaborately on the tutorial page you can find in the column on the right here.
Well, here it is. Thunderchild versus the tripods. Three paper models with some yarn and metal bits added, the diorama made of a 20x50 cm picture frame with acrylic paint. Enjoy the photos and till next time!
--PK
below you'll find a couple more pictures.
09 July 2016
Thunderchild (6): Ship's ready.
 |
| Ready to meet the tripods. |
 |
| no lifeboats yet, no davits either, but the guns and cables are there. |
06 July 2016
Thunderchild (5a): improving the smoke and fire
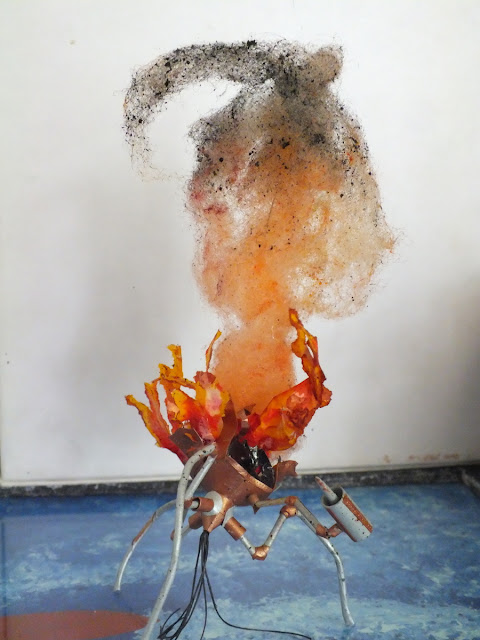
Hi there! I just did a little touch-up of all the fiery bits of the lost tripod. I
wanted to darken the top of the smoke cloud, because it would look more
realistic. I took my Indian ink for that purpose, took a brush and
tapped the ink from the brush into the fiberfill cloud. It needed quite
a lot of tapped brushes but in the end the result was that the top part
of the cloud became much darker and "sooty". With some burnt sienna
ecoline I did some accentuating in the yellow part of the cloud for some
more nuance. With some titan white acrylic I touched up the flames a
little. Now it starts to look like a genuine fire. Perhaps some more
tinkering will follow, who knows...


 |
| here in a close-up view, you can see that the yellow-orangey colour of the fiberfill has been spattered with the black indian ink. The flakeyness of the spatter also gives it more body, like there are little burning fragments in the cloud. It really needs time to dry, the fiberfill is like ultra thin plastic fibre, and it doesn't really absorb the colours. So the ink dries in little clumps on the fibres. The 'soaking' of the stuff in ecoline however, did give it a more equally spread colour. |
05 July 2016
Thunderchild (5); a fiery demise

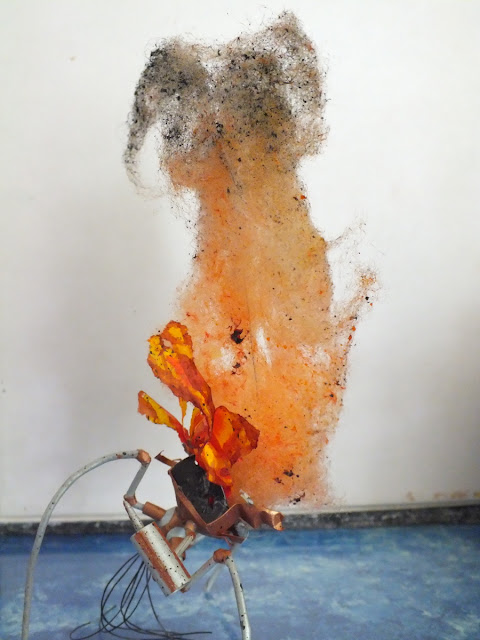
While Thunderchild awaits its lifeboats and other small stuff, the second tripod is finished. It is shown in the action of tumbling into the water, the three legs cannot longer support the burning "head" and the legs succumb to the weight.
One of the hardest things to make in a diorama is fire. Of course, you can use light and real smoke, like they do in model rail road dioramas. That is something clearly beyond my reach. I turned to fiberfill for smoke effects and well, for fire, I used blotting paper. or something close to it. For the colours I used ecoline (or coloured ink, if you are not familiar with the aforementioned term). I ripped the paper in small shreds and tried to simulate fire. When it all has dried and set, I'll model it all a little more.
For now, here are some more photos of the tripod and a couple of detail shots of the ship.
03 July 2016
Thunderchild (4): a direct hit!
Hi friends.
Although today I am not really in the mood to do some building, I can show you some of the progress I made in the past week.
Firstly, I have made the second tripod. It has been shot right in the face plate and exploded. The remains, billowing dark clouds out of what remained of the "head", is starting to topple and fall into the water. This is what I have in mind, and this is what I made of the "head" of the tripod:
I used lots of leftover cut-offs from the build of the first tripod, and tried to make it look as if it really had a nasty high-powered explosive ending.
Although today I am not really in the mood to do some building, I can show you some of the progress I made in the past week.
Firstly, I have made the second tripod. It has been shot right in the face plate and exploded. The remains, billowing dark clouds out of what remained of the "head", is starting to topple and fall into the water. This is what I have in mind, and this is what I made of the "head" of the tripod:
 |
| The tripod is held here by its yet unfinished legs, pinned into a cork on which I put a weight to keep it upright. |
26 June 2016

Thunderchild (2)
 |
| So the Kreuzer Emden gets a new name, eh? |
Now the ship is nearing completion, it is time to tell a bit more about the rest of the build. First of, I am not the first one to make such a diorama. The scene I planned is derived from one I saw done in styrene a couple of years ago. But as far as I know it has never before been done in paper. When asked where he got his creative ideas, jazz- bass player Ray Brown used to say: “steal anything you can”. So I did too.
So, credits where credits due: thanks to Marco Scheloske for inspiration!
So there you have it. In the title and certainly the link above it already became apparent but for those of you that could keep their curiosity in line and read on: H.G Wells’ War of the Worlds. Thunder Child. Martian tripods. That is the story in three short sentences.
19 June 2016
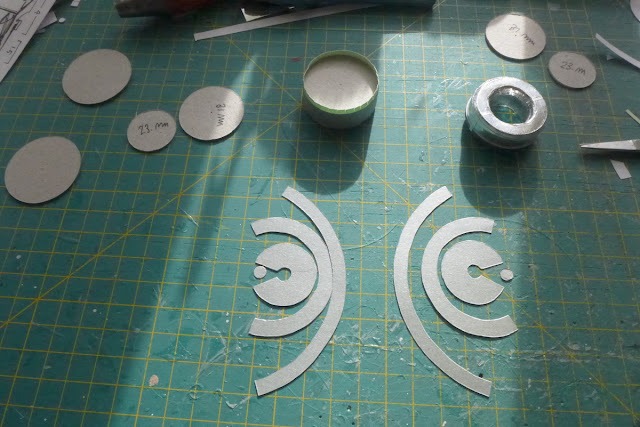
There is something cooking...
Although I promised a What-If, it has become something else. Creativity moves in mysterious ways. The idea I was tinkering with is not thrown away, it just needs more tinkering. And I wanted to make stuff. So there.
And yes! Today I suddenly found myself in my hobby room, with an Xacto in my left hand, humming and singing along to some old Paul McCartney tracks and Bowie's Blackstar album and also listening to the new KD Lang/Neko Case/Laura Veirs album. Which is not bad at all.
For now I just show you some of the stuff I am doing now, not yet revealing what it will become although it is easy to find out what I am working on...
 |
| That is: easy to see if you know what that silvery paper print is. But chances are you don't. And I am not going to tell you. |
13 June 2016
Not there yet, but..
... Here's an update.
Although I haven't got anything to show you yet, I have been diddling and fiddling with paper again. I have left the N1 for the time being even though it is calling me to get it ready for the shelves.
I have been doing some preparatory computer redesigning stuff for a what-if which now is in the first stages of testing. it involves two models and a diorama. It still needs more tinkering, I am afraid but hopefully in the coming week I will have some time on my hands to have some showable results.
I also have invested in a new printer, because the old one started to show inaccuracies in printing. The ink was clogging a little too often and the results were disappointing. It again is an A3 printer, a little upgraded from the last one. Compact shape, also an A4 scanner, top document feeder, which might be handy for business like stuff in the near future, extendible paper tray for A4 (landscape) to A3 (portrait) but also a manual feed input at the back. Great. It prints well, has a little less options in paper types but in top quality it all looks fine to me. Still have to try photo paper yet.
I wanted to visit the Luchtmachtdagen (the Dutch Air Force open days) last week, but Friday I had to work and for Saturday the predictions were it would be very crowded and The Red Arrows weren't performing because of the British queen's 90th birthday. The live feed the RNLAF provided showed me it was crowded indeed. With an excellent view of the air show (and somewhat sloppy camera work here and there) I can tell you the Italian Frecce Tricolori were doing an awesomely good job of letting me forget the Reds weren't there. What an amazing show. Very very tight formations, no gaps in the performance and oh, that Lomcovak! That was something I would have liked to see for real.
(this vid up here is one from 2011 but it shows what an amazing manoeuvre it is.)
It usually can only be performed by propeller aircraft. The MB339 apparently is the only jet that can perform this weird tumble. A somewhat rough translation from Czech is "drunken stumble".
Also present was my pet hate, the F-35 Pork Chop. The Dutchies stupidly bought into the "dream" and we are going to buy 37 of those money guzzling chubby short-of-ammo shoot and flee planes. I just think it is a dramatically bad aircraft. Not just the financial part, although that is also very bad indeed. It is just that it is not a very capable plane. it flew together with an F-16 and a Spitfire. What an awful sight. One beauty from the propeller era, a very sleek, capable and light aircraft and the fat winged blob.
One consolation is that "we" probably are going to fly the M346 Master as a trainer for the Pork Chop. Aesthetically, that is a beautiful plane. And in my opinion all that the Dutchies need anyway. They can keep those two Pork Chops they already bought for the QRA's, for all other stuff the M346 seems well enough to me.
/rant
Okay, anyway, hopefully I can show you some stuff later this week. Until then, stay safe and have fun.
--PK
09 May 2016
Juno is approaching Jupiter!
A couple of years back, a new kind of probe was launched from Cape Canaveral. Never before was a deep space probe equipped with solar panels. Up until then, all of them were powered by an RTG, a radio-isotope thermal generator, basically a kind of small nuclear reactor which could provide probes with power for a long time. For Juno it was different. The probe was fitted with three very large and sensitive solar panels. They would be able to provide Juno with enough power to fulfil its mission. Juno was put on top of a big Atlas V 551 and was launched the 5th of august, 2011.
And now we are just about a month away from Juno entering the Iovian system. And what a mission it is going to be. Circling the giant gas planet in a polar orbit, Juno will map the planet's gravity and magnetic fields and study the different atmospheric layers and their compositions. After some 35 orbits Juno will be sent on a collision course with Jupiter's atmosphere and will be destroyed. Scientists don't want to pollute Jupiter's moons, possibly containing life, with debris which might be contaminated with earthly bacteria so burning up in Jupiter's thick atmosphere was the best option here.
Now you might want to make a model of it. Well, there is a very nice paper model of Juno available.
I made Juno, twice, actually, one in 1/96, put on top of the launch vehicle, and one in the deployed state, in 1/48. Twice as big. I used the model designed by John Jogerst as a template and remade the solar panels and added details to the visible outboard equipment of the probe. Here is the start of the 1/48 build story on my blog. Here is the 1/96 build.
John Jogerst's model is downloadable here as well as my add-on detail set. you can build the model without using the detail set of course but it does give lots of extra depth to it. That is up to you.
 |
| Juno as I build it, in 1/48. This photo was made using just a bright white flash light to imitate the harsh sunlight in space. I suppose you would see Juno like this if you were to meet her in space yourself. |
02 May 2016
Still here (2)
Nothing new yet from the paper frontier.
There's a busy week of filming coming up, starting this weekend. Looking forward to that.
My hobby room has been a mess after I ground to a halt with the N1. Yesterday I tidied it. A clean room should give more space to think and contemplate on creativity.
Plans are to get the N1 just the outer fairing for display purposes first. The spacecraft inside can come later, if ever.
I think I really want to do another aircraft, too. Something out of the box (or its card equivalent) with the restriction I cannot modify parts. Just to get something nice going on again.
I don't like this tired, lethargic state I appear to be in. But the lack of creativity just keeps on holding me back. Hopefully that will change soon. I cannot force it, unfortunately.
Don't get me wrong, I have lots of plans and ideas. It just doesn't come out of my fingers at this time.
until soon, hopefully.
--PK
27 April 2016
Still here
...But nothing much happens.
Sorry for that. I just lack the inspiration and creativity. I hope to finish the N1 at least from the outside (the inside can be made any other time), so it can be displayed on the shelves.
I would like to start building but as said, I just don't seem to have the energy to do it. I know it will return but I cannot confirm it will be soon, unfortunately. I need to divide my energy between a couple of things that are more important at the moment.
There are some positive developments in the film about the satellite. and that's nice. We're getting closer to realisation.
Hopefully I can show you some stuff soon. But I can't make any promises.
Until next time,
PK.
21 March 2016
Sorry for the lack of updates at the moment. I have too much other things on my mind for the time being. Job-wise there was a lot of stuff going on the past few weeks. Not just the filming stuff but also moving out office out of the office building, back into our homes, for the time being.
It all pulled me out of my work flow in building the LK3 train and when I tried stuff out yesterday, I realised everything I did there and then was not looking good at all. I have to wait a while to get it all back on track. Not to worry, it'll take a couple of days, I hope, at the most.
--PK
It all pulled me out of my work flow in building the LK3 train and when I tried stuff out yesterday, I realised everything I did there and then was not looking good at all. I have to wait a while to get it all back on track. Not to worry, it'll take a couple of days, I hope, at the most.
--PK
13 March 2016
About a small Dutch astronomical satellite.
The building of the LK3 stages is (just temporarily) on hold; I had some other stuff to do. Here's what I have been up to lately:
Ever since I got involved in making television programmes and films, I had this dream about being able to make a documentary film about spaceflight. Being Dutch and all, I estimated my chances nearly zero. At least, that was what I was convinced of, then.
But two years back, I was invited to the Dutch Space Museum in Lelystad to bring them two of my paper space models, the Falcon 9 1.0 and the Curiosity Mars diorama, for adding them to their display. I was given a little tour around the museum's artefacts, one of the board members showed me round. He pointed at a small gold-clad satellite with solar panels that was suspended from the ceiling. "You know that one?" he asked. "Yeah," I said, "That's ANS. The Astronomische Nederlandse Satelliet". I looked at him. In his old eyes shone a surprisingly young and happy twinkle. "I built that!" He smiled.
I realised I was looking at one of the builders of the first and only completely Dutch satellite. He made something unique that went into space.
He took me to a display in which electronic components were shown. "This here is a test model of the on-board computer of ANS. NASA couldn't believe their eyes." There and then it hit me. We could try and make a film of this. A film about the people who led the Netherlands into the space age. I read and researched all I could find and I was brought into contact with more of the engineers and people who were involved in the realisation of ANS. Slowly the story unfolded and it all became quite amazing. All the efforts, the audacity, the ingenuity, it resulted in a piece of technology NASA was pleasantly surprised with, it was one and a half generation ahead of their standards. We are talking 1974 and ANS had a re-programmable on-board computer. 28K of solid state memory. It saved ANS' mission. And ANS did some great work out there in space.
Flash forward. Early February 2016. Still unsure whether the funding will be granted, we decided to push ahead and start doing the first interviews. As I write this, the people I want to interview are all still alive and reasonable healthy but some of them already are close to or even over 90 years old.
In the last two weeks I have been interviewing the two engineers that were project manager for Philips and Fokker. Hopefully the subsidy will be granted so I can go ahead and do the rest of the interviews. This film needs to be made. It's about a part of Dutch high-end technology that is almost forgotten. It should become part of the canon of Dutch science. The filmed footage looks great and we can hardly wait until we can start to edit some stuff into a teaser. Keep your fingers crossed for us!
I will keep you informed on the progress.
--PK
01 March 2016
N1 1/96 [8] - Blok D - and beyond
Hi. Here I am again. Now where were we?
Oh yes: the Blok D stage of the N1 lunar train. Now here's a bit of a problem: I was in a flow. I didn't take any photos of the assembly of the Blok D stage. Shame on me. I can only show you how it looks now. The toroidal tank and the oval tank were joined with the addition of a protective skirt around the oval tank and a latticework made from thin strips of doubled card.
On top I again made a latticework to add a ring. This ring will hold yet another latticework on which the LK, the Soviet Lunar Lander is placed. And that is up next. Further below a lot of photos of the progress in the build.
 | ||
| The Blok D stage. Almost all of it is paper, just the plumbing isn't. |
23 February 2016
N1 1/96 [7] - Blok D [1]
So now it's Block D that we're trying to make. Since I recently got the hang of making my own dome shapes and curved cones, I thought that this also was the best way of approaching this stage.
Block D is a torus fuel tank with an oval shaped oxidizer tank above it, which has a "skirt" around it. It has a lot of latticework and it carries the LK lunar lander.
I used the online shroud calculator to make these beauties:
Block D is a torus fuel tank with an oval shaped oxidizer tank above it, which has a "skirt" around it. It has a lot of latticework and it carries the LK lunar lander.
 |
| A nice abstract view on the tank dome parts. Yes, I need a new cutting mat. I know. |
I used the online shroud calculator to make these beauties:

17 February 2016
N1 1/96 [6] - Blok G
Now the big scratch build part of this build begins. When I left you last time, I had finished Blok V, the last upper stage of the official N1. Now all stuff built is inside the LK3 train fairing. There's a complete trans-lunar space train inside of it. The fairing is huge and very long. I made a test version of it out of regular 200 gpm2 paper to test its dimensions.
As you can see it becomes quite a huge model already.
 |
| The straight white top is hollow with a couple of reinforcement discs. |

As you can see it becomes quite a huge model already.
12 February 2016
N1 1/96 [5] - Blok V - ready!
So, I left you all with the start of the third stage, Blok V, when I did the little Bowie tribute.
Well, Blok V now is finished. The original hull was replaced by a second version, with less deeply embossed panel lines and that worked. Here's a photo of how large this behemoth is becoming. There still needs to be a piece added which is roughly the size of the two upper stages together. the story continues after the jump.
Well, Blok V now is finished. The original hull was replaced by a second version, with less deeply embossed panel lines and that worked. Here's a photo of how large this behemoth is becoming. There still needs to be a piece added which is roughly the size of the two upper stages together. the story continues after the jump.
 |
| Finished and awaiting toppings. card rings keep the latticework from bending inward. |
10 February 2016
Beauty shots of Major Tom's capsule
I found a star shaped tealight holder in the thrift shop. Now I could finish the display. I took some extra shots of it just now, so you can see what I did with it. I painted it with Mars black (black with red mixed in it to give it a warmer and deeper shade) and well, this is it.
Expect a N-1 update in the next two days. Until then, here are 4 beauty shots.
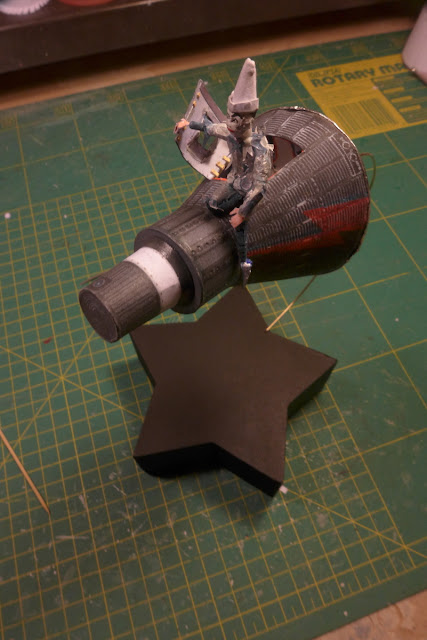


 Thanks for stopping by and see you soon.
--PK
Expect a N-1 update in the next two days. Until then, here are 4 beauty shots.


--PK
08 February 2016
I think his spaceship knows which way to go... (an inbetweenie)
If there is any pop singer I could be called a kind of a fan of, it is David Bowie. His songs have accompanied me in most of my adolescent and adult life. I enjoy his big variety in styles, his voice and the atmospheres he created on his albums. I was genuinely sad to read of his death. In the past few weeks his songs are in high rotation on my iPod. I must admit, I find his later work, from say, Let's Dance up to Reality not that compelling as the stuff he did before that (except for the Tin Machine albums and Earthling), but The Next Day (2013) is good and especially his most recent, Blackstar, is a remarkably fine album.
I wanted to do something as a little tribute to Bowie and his music, and what other way than to make a small model?
I took a couple of classic iconic symbols out of his catalogue and merged them into one display.
A little back story:
In 1995 I painted a huge picture (more than 4 metres long and almost 2 metres high) of Bowie's Space Oddity. It was used for decoration at dance nights in the quite legendary Vera Club, where I worked as a volunteer in those days. Not long thereafter, the piece was gone. Nicked by someone who appreciated it, I hope. I wish I still had it, I really liked it a lot. I only have some sketches of it left. This also was the starting point of what I wanted to make. It was the first time I started to do research on how the capsule actually looked and what I had to change to make it like I imagined it for Major Tom's spacecraft. It actually restarted my fascination with spaceflight again. Because of this, I started the collection of space books I now have.
The build story is below.
I wanted to do something as a little tribute to Bowie and his music, and what other way than to make a small model?
I took a couple of classic iconic symbols out of his catalogue and merged them into one display.
A little back story:
In 1995 I painted a huge picture (more than 4 metres long and almost 2 metres high) of Bowie's Space Oddity. It was used for decoration at dance nights in the quite legendary Vera Club, where I worked as a volunteer in those days. Not long thereafter, the piece was gone. Nicked by someone who appreciated it, I hope. I wish I still had it, I really liked it a lot. I only have some sketches of it left. This also was the starting point of what I wanted to make. It was the first time I started to do research on how the capsule actually looked and what I had to change to make it like I imagined it for Major Tom's spacecraft. It actually restarted my fascination with spaceflight again. Because of this, I started the collection of space books I now have.
 |
| A small drawing in an old sketch book of mine. In real life it was really huge. I wish I knew where it is. Lyrics of course © David Bowie |
29 January 2016
N1 1/96 [4] - Blok B - done and on to Blok.. V!
 |
| Blok A topped off with Blok B amongst its colleagues. Both stages are still not glued together. |
 |
| No, not Blok S. It's Blok V. Let's not make it more confusing, PK. The curved pieces actually are the third stage's engines. |
Subscribe to:
Posts (Atom)