
This also is probably going to be a journey with a lot of setbacks and slow progress involved. This stuff already happened when a couple of days ago my precious circle cutter broke. The thing is made from solid plastic and has a metal slider on which end the blade is held. The slider is kept in place by a metal nut which twists around a plastic screw. This screw broke off and unfortunately it wasn't repairable. This set me back 40 euros because I really need this cutter for al the rings and bulkheads. A necessary investment.
 |
| My dear old broken circle cutter with the metal slider and screw removed. The metal parts now are reserve parts but these plastic bits are a goner. )-: |
The U.S. government shutdown isn't making things easier at the moment because everything at NASA is blocked and there are an awful lot of other sites normally having great information but all their links to specific sites (NASA again) are dead ends (thanks a lot, GOP congress members, you belong without a doubt to the silliest bunch of people in the world - and I express myself quite mildly here).
Luckily I still had those New Ware diagrams laying around somewhere and all my notes concerning the Saturn V from when I built the plastic version. It really was of some crucial help.
 |
| © Up-Ship.com |
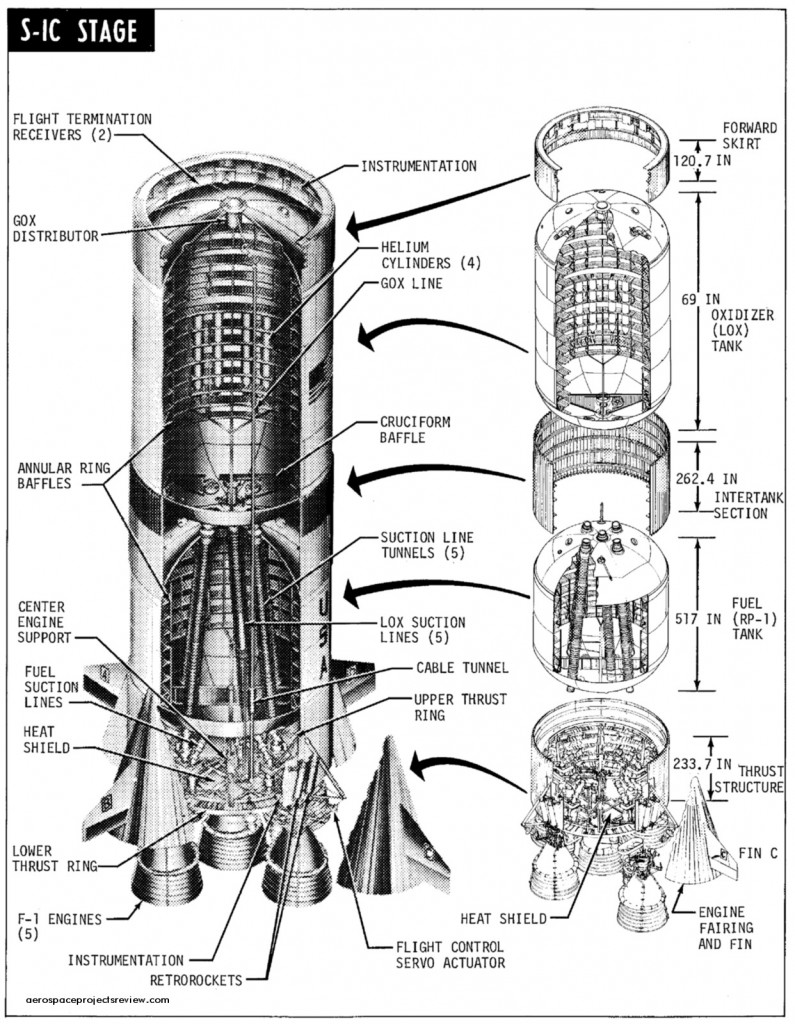
The available exploded views gave me no clues to where the parts like vents, valves and access doors should go. The NW instruction sheets did help me a little but still, I need those NASA references badly. I don't have the money to buy myself the famous David Weeks drawings, although they would probably be of a lot of help. The actual cost of the ten sheets isn't that much ($60) but the additional shipping cost ($38) makes the total an awfully large blood-letting. So I have to do it with the things I can find. I have to be able to do without these drawings. No problem. In the end it also is about the impression the model makes, not the accurate placement of all the doodads.
So far for the theoretical part of the build.
 |
| An early try of the RP-1 tank part of the first stage. Here the size already has been stated right. |
 |
| A first try with opening the side wall. This one still has straight angled corners, I prefer to use rounded corners in the eventual build. I think I aesthetically looks better when they're rounded. |
The last issue at the moment is the printer which is just a hopeless ink guzzler without producing one single usable printout. The Brother DCP 375CW I have used to give me really good and detailed prints but now it just is a frustratingly useless piece of crap. The HP 9800 deskjet is a good printer though but it lacks the scanner. So I am forced to let the the Brother take up valuable space just for scanning files.
All of this makes me a little grumpy. All in all, not a very good day, today. there are lots more to come, hopefully they are a lot better.
I really am looking forward getting this build off the ground and produce some pictures to show you. For now, it's just this text. As soon as I have something going on again I'll call in again. I am very sure there will be a busload of inbetweenies too, so keep yourself posted.
On a much lighter note, I was very pleasantly surprised when I found out last week my F-1 engine was picture of the week at papermodelers.com. Unexpected things like that can really make your week. Thanks again, Billy.

No comments:
Post a Comment
attention spammers: all posts are moderated before placing.
you won't get through. you lose.