byline

Paper models, photos and musings of a Paper Kosmonaut

31 December 2012

Mir 1/400 [9]

On the edge of 2012, this is this year's last update.
Spektr has been finished. I put it on the right docking node and glued it there. The solar panels were positioned using photos of the actual docking of Atlantis with the station. For that occasion, a Soyuz was undocked and flew back a couple of tens of meters to document the historic docking. Anyway, here's Spektr.


In the meantime I have started on Kristall, the module which was placed on the forward facing port to accommodate more room for the shuttle to moor. More on that after the jump.

29 December 2012

Mir 1/400 [8]

Spektr is getting its shape. Like al the other additional modules, Spektr is based on the illustrious TKS module that was designed by Chelomei's bureau in the early 70's. It has had many different purposes, names and shapes and even now it still is used in the ISS under the name of Zarya.
That also was the kit I used for making the first of the TKS modules of Mir. AXM has a nice 1/100 Zarya which I kind of kitbashed for Spektr. The cone is made by trial and error and lots of additions came from just card and mat paper. The module has been painted to give the outside the look of the thermal blankets it is wrapped in. I still have to do the solar panels and some extra greeblies on the hull.
I am quite pleased with how the Lyappa arm came out. This small arm at the docking part of the module is used to move the module from one docking port to another. All modules arrived at Mir's forward pointing docking port and then they moved themselves to one of the free ports around it.
I made it from a piece of a staple and the head of a pin.
Again, keep in mind you're looking at macro pictures of something which in reality only is 3 cm long. The fuzziness and irregularities can't be seen with the naked eye.

more pictures of the process after the jump.

27 December 2012

Mir 1/400 [7]

I could find some time to work on a few solar panels. I first did the dorsal panel, which differs from the two side "wings" because it was folded like an harmonica and extended by a truss between both of the sides, instead of panel by panel on a kind of pantograph arm. Whatever. Tech talk. I used a small round aluminium tube which I carefully sanded to a more squared shape. The zig-zag folded parts of the solar array were glued on with CA. A little layer of gloss for extra depth was added to the photo paper. The second array was one of the side "wings" of the base block. I used 100 gram paper for the yellow backside to make it lighter and thinner. Anyway, the pictures speak for itself. 


The right hand "wing" panel was divided into the five parts it originally folds up to.

More stuff after the jump.

23 December 2012

Mir 1/400 [6]

As Christmas approaches, I also have some other things on my mind apart from build paper space stations, However, I do hope to have some time to get this one a bit further.
Here's an update on what I have done so far.
First, the core module. I have added the docking node up front. It is solid, with rolled up paper inside. A hole drilled through, and shoved on the brass tube. The brass rod through it was inserted through the node to get the alignment of Spektr and Kvant-2 right. Small silvery docking collars were added to the node's outsides.
The solar panels are being worked on, the first one is the sole Kvant-1 "harmonica" panel. It was moved from I guess it was Kristall to Kvant-1 at some moment but the second panel came much later. The empty "stump" on the other side did have some small grappling hooks, which I tried to replicate.
I also did some work on the other solar panels of Mir, they were not just straight "wings" that once unfolded looked rigid and flat but they were segmented and one panel could let its surface face in several slightly different directions. I tested this on a small panel and it seemed to work. The eventual panels that will go on the station will be made of glossy paper. Here's where I am now.

More pictures after the jump.

16 December 2012

Mir 1/400 [5]

I got a little further. Kvant-1 is almost finished - it still needs its solar panels and truss but so does the Mir base block.
I wanted to put some more vivid colours on Kvant, it was too white. So I took a sand coloured watercolour pencil and did some small accents which I diluted with a wetted brush. After that it was greeblie-time. Around the grey back end, which is just a framework over which they wrapped a protective cloth I added a couple of grey squares and circles to give the octagon a more busy appearance. the PVA attachments were made from mat paper which I cut in an angle to get a more or less pyramidal shape. I reinforced it with CA and after curing I drilled a hole through for the PVA rods. They might be cut short later on, I still have to figure out how to straighten the PVA's themselves without the rod. CA perhaps? We'll see. Mir's base block also got some extra accentuations and I still need to do some more handrails. That comes later. Here's where I am now.
And some more pics after the jump.


15 December 2012

Mir 1/400 [4]

Slow, slow progress.
Days with just a few hours of good working light and a very demanding film scheme for the documentary I work on, led to some delay in the build of Mir. The amount of über-tiny pieces I made has been extended, sometimes as much as just one handrail a day, and I started with Kvant-1 today. I got quite far, compared to the last week's results.
The model itself is the one Zoltan designed for this occasion. I happily took the chance to use it for my model as well. I did some colouring and it still needs a lot of detailing. However, the basic shape is there. I used a solid filling by rolling up a small strip of paper. The last strip was copper coloured, and around that I rolled the eventual skin layer of the module.


more pictures after the jump.


07 December 2012

Mir 1/400 [3]

I thought to try and see how small I can go in detailing this little thing. After the long handrails I fitted yesterday, why not try and do some more smaller handrails on the base block?
So I did.

More pics and story after the jump.

06 December 2012

Mir 1/400 [2]

And on we go. Today I made parts of the front end of the base block. This too is an almost solid part because of the rolled up paper around the central brass tube.

After seeing what Zoltan did with his base block, I wanted to try and do the same at 25% of that scale. Some handrails alongside the wide section of the hull. I stripped some electrical wire and took one single copper thread to make one handrail. Another for the second one. Glued with CA. I now am working on the antenna dish at the back of the base block.
Up next will be the ball-shaped docking node and the solar arrays.

More pictures after the jump. 

05 December 2012

MIR 1/400 [1]

Well, there we go. At Paper Modelers my modeling friend Zoltàn Mertusz and yours truly have started their group build thread on building Russian space station Mir.
It was launched in 1986 and eventually was de-orbited in 1999. By that time it was way past its proposed lifespan and the ISS already was starting to take shape, albeit very small and slow.
Mir started life as a single Salyut like module, with the significant new feature that it had a multi point docking node up front. During the years that followed, several extra modules docked to the base block and by doing so formed the first modular space station.
More on Mir here, here and here (big but very interesting PDF).  
Now for the model, Zoltàn is going for a 1/100 version while I am returning to my favourite scale, 1/400. Today, after some designing, which will occur yet another few times, I guess, I made a start with the building process myself.
Small sized stuff!

More after the jump.

The Mir base block is my starting point.
I have reinforced the insides by rolling up strips of paper around a brass tube, for making the alignment easier. 
Larger than life!


Thanks to my very hipster pair of reading spectacles I am able again to tackle this small scale. Nice.

There's not much else to say in this stage, so take a look at the pictures and watch this space for the follow-ups!

29 November 2012

Falcon 9 / Dragon 1/96 [AXM] (2)

Here she is. A long white pillar with nine engines. the capsule was not hard to construct but also not really easy. It took some skill to get the shape of the curved heat shield edges right and to get the end cap on the top a bit more flush.


Sorry for the greenish glare on the pictures but it already was dark outside and I photographed with fluorescent tube light so it's not the best quality..
More stuff after the jump.

21 November 2012

Falcon 9 / Dragon 1/96 [AXM]

As promised, here is some picture proof of the build taking place at the moment. As I said, I still have to do the trunk and capsule and then it is finished. I used metallic paper and aluminium sticky tape for the engines. The exhaust pipes were all made from thin aluminium tubing. I also used some genuine chrome Bare Metal Foil to accentuate some lines on the main hull. It is less shiny than the sticky tape and a lot thinner so it has a different character. the conduits and clamps on the second stage were made from mat paper, which I laminated for the thickest parts. Afterwards, I painted it white and gave it a layer of gloss.

Some more after the jump.

20 November 2012

Busy, ...but building!

Just to let you all know I am alive, just very busy. 
However, I did find the time to do some building. Since the design of Nimiq 5 stalled because boredom struck and an increase in disinterest by lack of progress and actual lack of immediate visible result of the work, the project had been shoved aside and it's awaiting better times. The Proton now stands with an empty shroud (with two rubber bands around it) on the shelf. It will get its payload someday later.
I started work (actually, I am almost done now) on Alfonso Moreno's very nice model of the Falcon 9 with the Dragon capsule on top. Especially the engine section is wonderfully designed and detailed.
It will be a very static model, no moving parts, no detachable pieces. The hull is made of silk gloss photo paper and that is very much the shine the rocket has in real life. I added some bare metal foil and aluminium sticky tape strips here and there for accents. It looks great, in my opinion.
It now is too dark to take any god pictures of the model as it is now, but I promise some imagery tomorrow morning.
Until then you have to bear with me once more! Thanks for your patience.

09 November 2012

Work work work...

I am sorry to tell that I hardly have been able to get anything done on the Proton and my design of the Nimiq-5 the last week. I have been so busy with my job I couldn't find the time to either designing or glueing stuff. At the moment, I work on three film projects, some of them on full steam, others just hatching,  but all of them together kind of drain me from the energy I need to do the paper model stuff.
The only thing I did was concluding the Nimiq main bus I designed was to big for the fairing so I seem to have made a mistake in scaling somewhere. I've got to get back to the drawing board to solve this. But I cannot tell when I am able to pick it all up again.
I hope I will get back to it all later on next week.
Bear with me!

31 October 2012

Building a Nimiq-5

Hi all,  I have just a small update for now:
Been a bit busy with shooting stuff for our next documentary the last couple of days. Long haul efforts it were, driving down to Amsterdam and back again two times and besides realising the biggest part of the job again consists of waiting. All went well and even better than expected. We came home with really great material.

As far as paper modeling, there was not much time for that the past week. However, I started work on designing a Loral SSL-1300 bus, the satellite type I want to have as a payload for my Proton-M. There is no model so I have to do one myself. Now I could have kept it simple and just put some stuff together to make a folded-up Nimiq-5 and leave it there. But while I started the design in Photoshop, I decided it might be fun to make it more of a full model, complete with extended solar panels. The step was even smaller to try and make it even more variable, to also be able to make it into other versions of LSS 1300 series satellites. So that is what I am up to at the moment.

A screenshot of a little part of the satellite bus. More to come!

24 October 2012

Proton-M 1/96 bare metal edition [7]

First: thank you all for my now 10.000+ views! I am very honoured and happy with all your visits. Please leave a comment now and then, if you like. Would mean a lot to me. 

And now over to the business of the day.
Briz has been finished today. The chemo-fuelled upper stage is a small and quite easy one to make, however, the torus fuel tank parts on the top and bottom half need some attention when you build them.

After further detailing the lower torus with some aluminium tape strips, I made the central part of the stage. The outer ring shaped part of Briz is an external tank which can be jettisoned. The actual Briz stage is inside the ring. This ring shape was made by cutting out some cardboard rings in which the central doughnut-like opening is created. The hull goes around these rings. To get them snugly fitting I used some paper thickening inside the hull piece so it was tightly around the cardboard rings.
Also, the outside was detailed by carefully carving the textured lining.

more after the jump.

21 October 2012

Proton-M 1/96 bare metal edition [6]

Back where we left off before last post, it now was the third stage that was in line for assembly.
First made were the tank dome and the engine section. The first and second stage have gimballed engines, they can swivel and by doing so steer the rocket in its trip up to space. The third stage does that by using a vernier engine. A small amount of the fuel is used for an engine with four small nozzles located around the central engine. You can see the base parts f those engines on the photo below. The seams of the tank dome were covered with bare metal foil.

I did some embossing on the lines at the engine section to make it stand out a bit more.
More after the jump.

18 October 2012

Proton-M 1/96 bare metal edition [5]

I suddenly realised there was something wrong with the second stage. I had forgotten the part of the 2nd interstage with the flags on it was white and I also really wanted to do something more with the blast holes in the top of the stage. So what else was there to do than just take the whole stage apart?
Rip 'er to shreds!
 How I went ahead and what happened, after the jump.

14 October 2012

Proton-M 1/96 bare metal edition [4]

Stage one is finished. Not here in the pictures, but trust me on that one. Tomorrow there'll be some pictures to prove, now it's too dark for any good photo.
All six fuel tanks added.
More after the jump.

13 October 2012

Proton-M 1/96 bare metal edition [3]

Although it looks like not that much, I actually did all of the fuel tanks, made the nose cones and the cable run on their sides. The first three tanks now are in place. It looks quite the part, I must say. The colour is bang on.
The cable runs on the fuel tanks are rolled with a knitting needle.

12 October 2012

Proton-M 1/96 bare metal edition [2]

With my new pair of glasses it has been somewhat of an eye opener again. Much more detail to be seen and more detailed cutting. Nice. Only thing is I really have to get used to this, moving my head around is like being drunk. All the world's moving and distorted. Oh well, it's for reading anyway.

So what did I do? Just some small progress. I did both the fuel tank domes, petaled parts I had to curve and edge glue with some CA. I then took small strips of light aluminium coloured paper to camouflage the seams and look like a kind of weld line of some sort. It looks quite all right, I think. Maybe it might not look like the original but it just looks good.

10 October 2012

Proton-M 1/96 bare metal edition [1]

So after the research on the Proton it's build time again.
I used Leo Cherkashyn's excellent model of the Proton-M as a starting point. I had to rearrange some of the parts to other sheets and copy/paste parts to make the most economical use of the aluminium coloured sheets of paper I wanted to use. (still I forgot some parts so I have to do yet another sheet...)
Yes, I already started. All the aluminium coloured sheets are treated with a coating of Digital Ground for better printing. This stuff is ideal for otherwise unprintable paper sheets.

So here's part one of the building process. More after the jump, as usual.

03 October 2012

I should have known!

It was the most simple and practical answer. Why are some Proton rockets bare metal and some not? Does it have to do with the type? No. Of course not.
I am preparing for some future model builds and I really wanted to add a bare metal Proton to my rocket garden. They look awesome, I think. Now a lot of Protons (the K and M versions alike) are painted white. Big red fat lettering along the body spelling the cyrillic "Прото́н" with either a M or nothing under it. (never seen a "K", anyway):

A Proton K launching Zarya, the first Russian component of the ISS back in 1998. 
The orange colour of the clouds is because of the very poisonous and corrosive fuels the Proton uses.
Note the American flag on the second stage - Zarya was co-financed by the US.
(photo: NASA)


But...

30 September 2012

Well, that was fun.

Now let's back to the serious stuff again.
Here's the Gatchaman Godphoenix. Scale is unknown, but is is at about 70% of the original model.
I liked the build, nice parts and shapes. Inventive way of making the air inlets. Result is pretty decent but this just was for fun and I didn't really intended this one to be meticulous. It's all paper apart from the deck dome, which is heat-shaped transparent plastic.


Here I am, a month from 42 and I am doing a plane from a kid's cartoon show from the seventies...

More after the jump.

26 September 2012

The edge of space

Today I read another article on how someone got hold of a cylinder of helium, a weather balloon and made an amateur weather package as a payload. For fun, he added the little toy train of his son and sent it up. He didn't forget to record this event and put a small camera in the science package. The result was a very sweet film of a toy train, very high up in the sky:


The video, as a lot of similar Youtube creations, with similar weather balloons, equipped with cameras and some talisman, was named "[fill in your favourite object here] carried to the edge of space"
Of course, at that height one can see the curvature of the earth and the thin line that makes up the atmosphere. But it is not the edge of space. Not by far. And however ingenious and spectacular the videos are I have strong objections calling things like this "to the edge of space".
Because it just isn't.
Why? I'll show you after the jump.

22 September 2012

What to do when one is bored of rockets?

...Then you build something non-rockety.


What is it? Where does this lead to? Is it a leprechaun's hat? Perhaps a weird tower? Nope.
Well then, what is it?

05 September 2012

Dnepr 1/96 [2]

Like someone said on Papermodelers.com, it looks like I'm turning them out like sausages, just like Nikita Khruchchev said. the Dnepr is ready for gathering dust.
What is there to add to the story already told? I took some pictures of the detailing work I did on the hull. The small strips of paper I used and the strips of sticky aluminium.
The pedestal I used came from the thrift shop. In a previous life it was a party cup for peanuts or other nutty stuff.
The wasp waist of the fairing looked like it was a small obstacle to tackle but it was very easy and it looks very good. This overall is a very well fitting kit, as usual with Leo Cherkashyn's models.
I also like the way the colour turned out. Although the lettering would have been white in the real world and here it clearly isn't, I like the metallic shine of the rocket.
Now here is a picture. After the jump there are some more.

Dnepr. Dnepr. Dnepr. Dnepr. Nice word. Nnnnnnnnnn YEP-rrrrrrrrrrr. Nice model, too.


04 September 2012

Dnepr 1/96 [1]

The steppes. In the middle of the Russian part of nowhere. A hole in the ground. An open hatch. Suddenly a green and silver pole emerges upon a bellow of orange smoke. It rises out of the hole and slows down. A bang. A flash. A small cylinder appears out of the cloud underneath the rocket and drops away to the side and with it a dozen or so small sealing rings are jettisoned. Then, after a fraction of a moment in which the rocket seems to be floating still in the air, the engines of the first stage ignite and with a roar they kick the rocket upward into the sky.


The launch of a Dnepr. At 1:13 a replay from another viewpoint


That's how a Dnepr [n-YEP-pr] gets wings. Ever after I saw a video of this happening, the model I had was pushed into the top regions of my to-do-list. Designer Leonid Cherkashyn has made a very nice model of the rocket, although, after printing I found the colours were not much like the real thing. Much too blue - and with an imprinted shine on the rocket's skin, something I have come to dislike since I use metallic paper for such things.
After some modifications I had a better matching colour and I printed it all out on semi matte metallic paper.


More of the build after the jump.

02 September 2012

Delta IV Heavy [5]

And there she is, ready for lift-off. The end result is very pleasing to the eye, it certainly is a big hulk of a rocket, three of those orangey-white candles next to each other. the real one is 72 meters in length, I really think it is America's most impressive rocket today.
As usual, it isn't your straightforward out of the printer build, I added a couple of things. The engine bells all got a layer of paint outside and inside ant an aluminium shielding made from sticky alu-tape I have laying around.


The skins of the rockets were printed on textured paper to imitate the foam coating on the real thing. It really improves the look, I think. The insides of the Common Booster Cores all were reinforced with sturdy cardboard circles and the upper struts, holding the three CBC's together were made from florist's wire whick I painted white and red.
There are some less satisfying points in the end result which I'll show after the jump, together with some other detailed shots of the Delta. 
All in all I am very happy how this one came out and I enjoyed the build a lot. Mark Cable's kits really are recommendable. take a look at them at Ecardmodels.

30 August 2012

Delta IV Heavy [4]

...And the build goes on.

But it starts to look like the final stage has begun. CBC 3 is nearing completion. I have to do the engine section and the I can start on the final assembly.
Nothing much else to say, except that I got two more detailed shots of the Delta and a sneak peek into one of my next builds for you after the jump. (-;

26 August 2012

Delta IV Heavy [3]

The construction of my 1/96th Delta IV steadily goes on. I don't work on it every day but I have finished the central CBC and the left one. I now am working on the right booster core, which still is in parts and needs a lot of work yet.
Here and after the jump are some pictures of where I am now.


Two boosters finished. A big rocket which comes together very nicely.

Clear Skies, Neil.

I also want to say something about the recent passing of Neil Alden Armstrong, He Who Walked On The Moon First.
He was 82, which is, in my opinion, a respectable age and an age on which one is expecting the end to be near. All of the still living Apollo moonwalkers are about 80. In a year or ten, fifteen, there will be no one left of them.

Armstrong had a very amazing life, to say the least. Not everyone on this planet has been privileged to have his name add to the pages in the history books with an event as crucial and important as being the first man to set foot on another heavenly body. Not everybody can say they flew the fastest manned rocketplane in the world 7 times,  went into space twice and walked on the moon.
Some people on the internet have called him "badass" and "the best astronaut" and equally misplaced qualifications. I don't think Armstrong would describe himself as badass at all, let alone he'd ever consider himself to be the best astronaut.


Armstrong in the commander's seat for Gemini VIII in 1966, awaiting liftoff.
What Armstrong was in my opinion?  Not the stick and rudder man like Yeager. Not the fun-driven hot dog pilot like Pete Conrad, Wally Schirra or Gordo Cooper. Not the religious experience on the moon having man like Jim Irwin. He didn't even have the ambition to be the first, like his LMP on Apollo 11, Buzz Aldrin. It just happened he was the first one assigned to get out of the LM. Because the door hinged Aldrin's way.


I read Armstrong's biography by James Hansen a couple of years ago. A big book and a worthy read. It describes Armstrong as an almost boring man, reluctant in his status of hero, reclusive and a man of just a few words. He had to face up to the fact he'd become and always will be The First Man Who Walked On the Moon. He very quickly grew tired of being asked the same questions over and over again, signing autographs and being displayed as a hero. It just was not what it was all about, in his eyes.
He was in his element when he flew and when he taught what he knew to younger people when he was teaching at Cincinnati University.
In his later days he sometimes appeared in public, speak on a congress or, even more rare, do an interview. I think he'd already said what he had to say a long time ago. And he was a man of just a few necessary words.

Neil Armstrong was a very modest and intelligent man, a skilled and calculating pilot, and above all, an engineer pur sang.
He certainly is someone who will be greatly missed, who left his mark on society forever by placing his boot in the powdery, grey soil of the lunar surface.
Clear skies, Neil Armstrong.

15 August 2012

Delta IV Heavy [2]

Some of you might have solved the riddle instantly, others will have scratched their heads. What I am building now of course is the Delta IV, a big American booster rocket and in the version I am making the biggest on the market at this moment. This Delta IV Heavy consists of three CBC's (Common Booster Cores), bolted together side by side, of which the middle one carries the payload to orbit while the outer two act as boosters. This impressive rocket is indeed a big boy, measuring about 72 meters and weighing more than 730.000 kilos. 
Originally, this rocket has the same distinctive blue colour as the other Delta rockets have. It is just for safety that this one carries the orange foam insulation much like the retired Shuttle's external tank had. When the rocket ignites on the pad, it gets engulfed in a big cloud of flames of vented gaseous fuel residue that surrounds the rocket's business end. This causes the skin of the rocket to catch fire during the start. The flame retardant in the foam makes sure the rocket won't explode and kills the fire. That is why, when a Delta IV leaves the pad it always looks scorched.

Here is a video of the first launch of the Delta IV Heavy. You can see the flames surrounding the rocket after ignition and the completely charred rocket after leaving the pad. But it all has been taken in account beforehand.


So I did the central booster of the rocket now. It is huge, it towers over all the other rockets apart from the Saturn V. It really is big.
The model did not provide stabilization rings for reinforcement inside the long tube. I made them myself and cut out some 8 or 9 circles for this central booster alone. I also made some minor adjustments to the engine section to make it all dead straight.


more pictures after the jump.

12 August 2012

Riddle me this, riddle me that...


What is PK up to now? What is this textured paper for? Is it orange? Yes it is. Does he have to give away a little more? Oh okay, after the jump, then.

08 August 2012

MSL diorama [4]

We're finished. Curiosity has also landed on the surface of this diorama. Today I made the arm, the things on the front and top deck (two drill bit holders up front and three skyhooks on the top deck - with these Curiosity was attached to the cables of the Sky Crane. Up front on the side there is the hinge of the camera boom. This boom, or pole if you will, lies flat on the top deck during transport and landing and has yet to be deployed. My 1/48 version can be straightened, too. And the camera head can turn.  I used tightly rolled paper tubes and a pin for this construction. the camera head slides over this construction and is only glued to the paper.
As usual after the jump are more pictures of the finished model and diorama.
If you like it, please feel free to leave a comment!


Curiosity is on the surface!

-PK

06 August 2012

MSL Touchdown!

Curiosity has landed safely on Mars! We're there again!
© JPL / NASA
 These are the first pictures of the HAZCAMs on the rover. Curiosity's shadow clearly visible.

[UPDATE 13:00] : In the meantime My little Curiosity also has gotten its wheels, I started working on the arm with the big Mars Fun Pack at the end and the Sky Crane is installed at the diorama frame looking impressively in action. Pictures follow later today or tomorrow.
-PK

05 August 2012

MSL diorama [3]

Counting down the hours to landing, I did some more work on Curiosity. All the wheels are now there and they all look good. At least good enough to use. Two of them could've been a little better. But CA is quite unforgivable. Glued is glued. I just could adjust a little here and there. Oh well. Hardly noticeable.
And yes, I had to. I couldn't leave it as is. I made the wheel bogeys all moveable. The central axle moves, but the secondary rear axle also pivots. The wheels won't be able to turn though, and they also cannot steer. But I think this also is fun to look at.
Because of this I also decided to change the diorama setting a little. I wanted Curiosity be able to show the moving parts, so, I couldn't attach the Sky Crane to the rover. So I decided on this:


More pictures of the building and moving bogeys after the break.

04 August 2012

MSL Diorama [2]

While the weather is good, one should take advantage of it, I think. In doing so, the building of this diorama has suffered some negligence. But so be it.
What do we have then?
Well, the box that makes up the body of the rover Curiosity is ready. Still needs dome greeblies, though. I do a lot of scratchbuilding, it all is quite small so some parts are hard to make from the printed version. I added an axle to the rover to support the wheel arms a little better. Today, I did one of the wheels, more as an experiment to see if it was feasible. It was. It kind of looks like the real wheels now. I like it. Five more to go. But I am afraid that won't be today.
Curiosity taking shape

Monday morning around 7 o'clock CET, Curiosity will land on Mars. Live on NASA! So if you are able to, watch it! Might be some spectacular stuff, because there will be live images from the rover's camera!
More building pictures after the break.

29 July 2012

MSL diorama [1]

It's time for something longer again. I am going tomake a diorama of the landing of Curiosity, NASA / JPL's newest Mars rover. It will land in the first week of August if everything goes to plan. 


A new frame for a new diorama.


The MSL (Mars Science Laboratory) is a much bigger endeavour than the previous two missions to Mars' surface were. Sojourner just was a rover the size of a medium-sized radio-controlled toy car, just 65 cm long. Its successors, the MER-twins Spirit and opportunity, were double sized, measuring one and a half meter in length. Curiosity again is twice as big, it has the size of a small car, being 3 meters long. So while the other rovers could be dropped on a parachute, covered in a coat of balloons to break their fall, they had to come up with something else for Curiosity, being so much heavier.

Enter Sky Crane. A robot which is not supposed to land but to break the fall of Curiosity and hover over the ground at a height of 7,5 meters. The rover is winched down on three cables and when the wheels touch the ground, the cables will be severed and the Sky Crane will fly away in a large arc and crash at a safe distance of the rover.


28 July 2012

Redstone MR-3 Friendship 7

Before America was confident enough to send a man in a Mercury into orbit on that silvery Atlas, which had the habit of blowing up sometimes, they opted for so-called suborbital flights.these flight patterns were much simpler than getting a capsule in orbit. It actually just was a ballistic trajectory, where the rocket lifted off in a steep angle, getting as high as possible. Just before reaching that point, the rocket would jettison the capsule, which would rise a little further on a weightless parabola. The astronaut had about 5 minutes left to test the reaction control thrusters, read some gauges and maybe take some pictures before falling back. To help braking, the Mercury used retro rockets, strapped onto the heat shield. They fired one by one to slow the capsule down before they were jettisoned.

This firing of the retro rockets was not necessary with a ballistic flight, but they tested them anyway. From that point it went down again. because of the quick deceleration the astronaut got pressed back in his seat and experienced some 8g's. If the angle of re-entry was too steep it even could be higher.


The candle.
Alan Shepard, America's first man in space, experienced this first hand on his flight. Upon re-entering the atmosphere he got more than 11g's, eleven times his weight pressing down on him. He grunted "I'm O.K." a couple of time to let the control room know he still was alive. At the time he splashed down in the Atlantic, only 15 minutes were passed since his launch.


Shepard's capsule was different from the rest because of its windows. While all of the other flown Mercury capsules had a large rectangular window in front of the pilot's face, Friendship 7 had two small portholes on the left and right side of the astronaut. But there wasn't that much to see for Shepard in those 15 minutes. His time in the cockpit though, was a lot longer. Before he was launched, due to delays on the pad he had to wait for three hours. On top of all that he felt an urgent need to pee. When they said he couldn't egress the capsule, he did it in his suit. He was almost dry again (an airconditioned suit makes this go quite quick) when there occurred a new small anomaly. The control room wanted another delay but Shepard had enough of it all.
"Allright! I'm cooler than you are!", he barked. "Why don't you fix your little problem and light this candle!?" Not much later he lifted off the pad.


The building of this model was very easy. The most parts were in the engine section. The top part with the capsule followed the same process as with the Atlas. This time I made some photos of it all to show how I did it. Pictures after the break.

25 July 2012

Atlas MA-6 Freedom 7 in 1/96

Another inbetweenie. This time an addition to my ever growing rocket garden. This is the Atlas-D which lifted John Glenn into orbit in 1962. I used silver card for the hull and tie fairings and cable runs. The engines were made from thick grey card and I used some bare metal foil for the silver accents. the kits used were Mark Cable's remake of the precision paper models Atlas model and Carl Hewlett's Mercury capsule, reduced in size to 1/96.

The lettering on the hull was done with decals I printed myself.


A shiny candle.


more after the break.

21 July 2012

X-37b Finished

Another one to gather dust on the shelves.
The X-37b shown while landing after another long-duration top secret mission for the DOD.
This was actually a nice and short fun build for a change. It wasn't as meticulously detailed as, say, my Titan or Soyuz FG but it is a nice model anyway. It's basic-ness was just improved a little by opening the wheel wells and the textured skin.


More pictures after the break as usual.

17 July 2012

Atlas awaits Boosters

The Atlas core booster is finished. Not entirely enthusiastic about the result but anyway, it is there. It still needs the five booster rockets around the base but I still am thinking of how I can improve those rockets. Here's a picture of the Atlas for the time being.


In the meantime I started with a new thing. (see post under this one)
-PK

X-37B

With the retirement of the space shuttle one would think there are no operational space planes left but that's not the case.
In the early 2000's NASA tested a small craft called the X-40, a small aircraft with a wing shape slightly reminiscent of that of the shuttle and a size that could brig back memories of the old lifting bodies frm the late 1960's. This plane developed into the 120% larger 
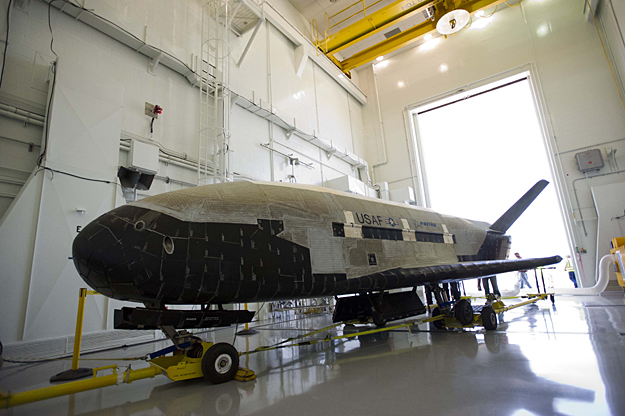
X-37B space plane. The USAF ordered two of those small unmanned spacecraft and the first one was launched in 2010 on an Atlas V. It spent 224 days in space. A second X-37B even spent 469 days up in space.

The real thing after its 2nd flight. Photo: Boeing/USAF

John Jogerst made a kit of this small spacecraft available and recently changed the design a bit, adding the heat resistant tile structure to the plane's surface.
While I am awaiting a sudden moment of inspiration for the Alas boosters to be made, I decided to do Yogi a favour and do a testbuild of the new design.
But I can't just build. I am not like that. I started tinkering a bit more and gave the whole plane some more depth and structure. I added the insulation blanket texture and I made a post-flight version, with scorched heat shield and sides.
And that is what I am making now. And I still am adding details. I wanted to make it into a diorama while the plane is landing, so I opened the landing gear doors and fabricated some wheel wells.
This is getting out of hand, as usual.

Pictures after the break.

14 July 2012

One down, one to go.

I have finished the first half of the Atlas' fairing. It took some time to punch out all the little round parts but there it is. I tried as best as I could to follow the original placement of the panels. I am afraid it sometimes needed a little artistic license. It looks quite close to the original, though.


I had a small problem with the placement of my reinforcing rings and that of the panels down right, but I solved it by kind of ignoring the ring is there. it gives a nice impression of the panels anyway.
Now the second half. It is different from this half so it is back to the beginning.
some more pictures after the break.

Art?

While working on these acoustic dampeners, the residue caught my eye. Artistic or not, it certainly is nice to photograph in macro.