byline

Paper models, photos and musings of a Paper Kosmonaut

28 November 2015

Ariane 5 1/96, pt. 25 - the fairing [4] - Finished!

Yes! Finally PK has made a good cone and now the Ariane 5 is finished. That is, it is now complete and can take its place between its brethren on the shelf. I still need to make the "half open fairing" and that will come some day but for now I just am glad the rocket is complete. The new cone of my own design is looking good, even though I now have more seams running over it than the original three- piece cone. This one has the right curve.
So, here are some pictures. Hopefully you like them. Thanks for bearing with me and having the patience during the long wait this year. Next build already has begun so shortly some progress on that one. For now, here's the Ariane 5 with Herschel and Planck under its fairing.


Room made for next project. Not sure whether it will fit there..

25 November 2015

Ariane 5 1/96, pt. 24 - the fairing [3]

Getting quite busy on the rocket shelf.
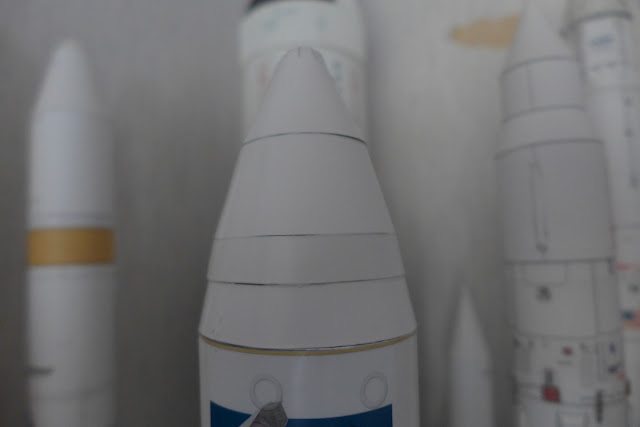
Well, that was something, the past days. Hours of work and thinking down the drain. At least, for a great deal. The Ariane is on the shelf now, together with its peers. But I am not happy with it. Everything below the fairing looks wonderful to me. It's precise, tightly fitting and unblemished. It looks very close to perfect to me. So a fairing with very visible seams and a bad fit is not the crown on this job. And this is a bad faring ogive. The parts of Mark Cable which are taking up the top part are great, but the transition between his top and the cylindrical part of the fairing sucks. I redid it five or six times but I couldn't get the measurements just right. I finally took the one that looked the least bad and used it in the ogive. But the cone is crooked. It is not elegantly curved. Grmbl.

Grmbl.
It kept on lingering through my mind, while I was taking a walk through the park this afternoon with my girlfriend. It has to be done differently. It needs to be good looking. I haven't spent that much time on the rest of this build to leave it there with a messed-up fairing.

So I started thinking the unthinkable, at least, unthinkable for me. 

[more after the jump]

24 November 2015

Ariane 5 1/96, pt. 23 - the fairing [2]

Okay...
Bear with me.
It is not going according to plan. Sometimes things don't work out as brilliantly as you want them to be. The curved paper stuff went very well but the closure of the two halves was bad. Wobbly, not nice and straight. I was very disappointed but I want to have this rocket finished.

I have decided to go for plan B. (which I made up after plan A failed. I never make a plan B beforehand...)

For shelf storage, there will be a one-piece fairing. Just a cylinder with a cone on top. It will come off by just raising it carefully. For display, one half fairing will replace that cylinder. This one also will have the sound suppression inside.

At the moment, I have tons of troubles with the full cone. It just don't fit and I am wasting sheet after sheet of silk matte photo paper. Even after tests with regular paper it just keeps going wrong. For today, I'm calling it quits. I an only handle so much setbacks...
More (hopefully) pretty soon! And with some pictures.

-PK

21 November 2015

Ariane 5 1/96, pt. 22 - the fairing [1]


Two halves of the straight part of the fairing, with the second stage of the Ariane 5
So, it's time to get back to the Ariane 5! I left the project when I was trying to make the final part of the build; the fairing. I wanted it to be separable and yet it still had to look realistic. So, tongue and groove style, with a black inside with sound suppressors, a sturdy layer in between, providing tongue and grooves and an outer layer in semi-gloss white. My first efforts stranded when the outside layer came out all buckled and misshapen. It had to be done differently.

The new plan was to shape the three-layered shroud by wetting the two inside layers of card and rolling it around a mould to dry and fixate the shape. The outer layer, made from photo paper, will be glued as the last part. It all needs to be quite exact and fitting. That's why I shoved it aside for so long.
Yesterday I wetted the paper and let it take shape around the moulds. That came out surprisingly well. Yesterday, I joined them with glue and put them back on the moulds for curing. Now it's the time for the result.

For the time being I made a crude quick fairing, to give myself an idea on size and shape. It turned out I really disliked the pointy top. So that needed some extra attention, too. And well, uh, looking at the Vinci engine (the one that powers the 2nd stage) I wasn't that happy either with its looks. Too straight a cone to be an actual engine exhaust. So lots of things to do!

The rest of the story after the jump.

11 November 2015

Three more.

I am getting back on track. Slowly but surely. And I really like making these little planes. It's  not about pressure, no intentions to make them top notch super clean and competition-worthy models, it's just about having a bit of fun, messing about with Xacto and glue, enjoying making a little old plane out of a sheet of paper.
Fabrizio Prudenziati's models are just the right thing for this. Nice and simple and fun to do. 
However, I slowly am getting more detail in them, too. The last one I did, the British SE5, had a two-sided, 2D Lewis gun on a Foster mount on top of the upper wing. I wanted to make it more of a 3D thing, so I scratch built a new one. The German DR.I is the one the infamous Red Baron flew, Manfred von Richthofen. This one was fun to make, too, with its little engine parts protruding from underneath the cowling. The props and wheels of all the planes are able to rotate. The Sopwith Camel, the third new plane, is also a British aircraft. In this one, the engine is clearly visible. It had two machine guns that shot through the line of the propeller, but were 'tuned' not to fire when there was a blade in front of the barrels. It made the aiming easier but the amount of bullets fired was smaller. The SE5 with its Lewis gun on top could fire over the propeller's diameter but the pilot had to operate the gun with a cable that was attached to the trigger. He could reload the gun's ammunition drum, however, by pulling it down on the rail.

There isn't really a lot more I want to share at the moment, so I suggest you just take a look at the planes. More details after the jump.