byline

Paper models, photos and musings of a Paper Kosmonaut

24 September 2013

Saturnial Prelude [7]: The finished F-1

Sunday and today I've worked on a little way to display the finished F-1 engine. I took some thick yellow paper and scratch built this little transport cart for the engine. I then grabbed a photo frame and quickly designed a concrete block paved surface. Here's the final result of my Rocketdyne F-1 engine model.
I hope you like it. Up next maybe an inbetweenie, or maybe the start of something really big...
'til then, thanks for watching!
--PK


(A lot more after the jump, as usual.)

22 September 2013

Saturnial Prelude [6]

The F-1 engine has been finished. All the piping is added and I am quite pleased with it. But the whole display is not entirely finished. I now am working on a small kart on which the engine was transported from one assembly hall to another. That will come later, here's the pictures of the finished Rocketdyne F-1 engine.


And as usual, more after the jump.
Thanks for taking a look!
--PK

20 September 2013

Saturnial Prelude [5]

Time is precious, and that's not any different with this build. There's a lot to do besides paper building and so progress is slow. But I like what I see. Since I redid the small plumbing at the side of the turbo pump manifold, I really got back into this build. This engine started out as having to end up as another version of Greelt's F-1 engine, which is, in all regards, a beaut. But after the engine bell was made, I just started freewheeling as usual. Discarding most of the parts of the paper kit, making my own and just trying to make as much detail as possible.
I have started on the big tubes around the neck of the engine. These pipes directly distribute the fuel and oxidizer to the turbo pump and the engine. The amount of fuel they needed was incredibly high so they needed to be big.
I also found out the engine went through a lot of modifications before they were used with the Saturn in the end. This version is, in a sense, becoming a bit of a Frankenstein's monster. Greelt used the rounded manifold around the engine bell, while the flown engines had a shape that more or less resembled one's back end. Also, the plumbing differs a lot between versions I have pictures of. Presuming the engine didn't change a lot after the first couple of flights, I presume the other large differences are all older versions of the engine. (if not, let me know, I really am interested in those things).
Anyway, here's some paper stuff to look at. And as usual, more after the jump.
See you!
--PK


17 September 2013

Saturnial prelude [4]

Details. And redo's. I decided for example to redo the little plumbing lines that go from the engine bell's neck to the turbopump's manifold. They were too ugly after all. I now didn't use primer before painting them silver. The rest just are some more progress pictures with not much textual to add.

15 September 2013

Saturnial prelude [3]

Hi people, it's plumbing time. There is a real labyrinth of tubes, pipes and connectors all over the top part of a rocket engine, and that is especially the case with this one. The F-1 was immensely complex and because it was enormous, the amount of plumbing also was quite considerably. There was a huge
quantity of fuel that needed to be used and distributed all through the engine at an incredibly high speed. Don't worry, I am not going to explain the details of how this engine worked but all I am saying is that it took a lot of tubes and pipes and whatnots.
Using a busload of pictures which I got by email by my friend Zoltan (thanks!) I now am slowly adding most of it to my paper engine. This will take some time, which I only have in small quantities at the moment, so the progress will be small. Today I did most of the first quadrant of the F-1. It isn't all completely accurate but it gives a good idea of the overall look of the engine.
And it all starts with measuring, fitting, measuring again and fitting again and only then the gluing bit.
As you can see, I already added the pipe leading to the turbo pump fuel exhaust manifold here. (It's the little pipe on the left with the wider opening on top.) For the characteristical foursome of pipes next to it, I use green floral wire. It is easily bendable and sturdy at the same time. The engine bell itself is also cooled with fuel. The liquid nitrogen was so cold, it easily could make this little detour through small tubes that together are shaped like the engine bell. (this is shown in the print.) Some vents were placed on both sides of the engine bell to prevent overpressure. These pipes were made from rolled-up paper.

The rest of the story is after the jump.

12 September 2013

ALT 1977 1/400 [23]: The final pictures

As promised, I now finally have some pictures for you with a nice blue sky with some white clouds as a backdrop for my ALT 1977 diorama. I used a flash to highlight the stack a little more otherwise it'd be just a silhouette. In the last picture (after the jump) you can see my out-of-focus thumb and first I felt the picture was bad because of that but then I realised it still was a nice reminder of the actual scale. So I left it like that. And now, without further ado, here's the last couple of photos of the SCA/Enterprise stack. Hope you like them.
--PK

07 September 2013

Saturnial Prelude [2]

Just a little further. I made a lot of extra parts out of metallic coloured paper. And I used aluminium sticky tape for the welds of the gas turbine exhaust manifold. Is there more to say? No. Are there some photos then? Yes. Three. And here they are.


We're still far from ready. So there will be more to come! Stay tuned.
--PK

06 September 2013

Saturnial Prelude [1]

One of the items of my long list of to-do builds was the Rocketdyne F-1 engine in 1/48. And since the next big build will indeed be the Saturn V, I thought it appropriate to start the whole cycle with a little prelude; the building of an 1/48 F-1 without the heat shield blankets it had in flight.
There's only one F-1 that matters and that's Greelt Peterusma's F-1. Obviously intended to be part of an entire Saturn V rocket, Greelt never came further than the full S-Ic first stage, the J-2 engine and the interstage between the first stage and the S-II.
However, the model is legendary and I already once made one of his J-2 engines in 1/96. That was very doable and gave me the confirmation the F-1 certainly was able to be made in that scale. So tht will be integrated in the paper versin of the complete Saturn V later on.
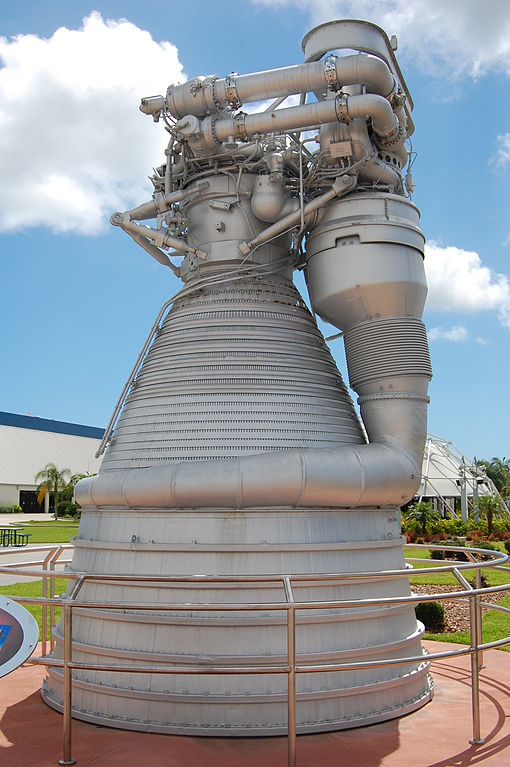
Now it's time to do the big one. The F-1 is size-wise the biggest rocket engine ever built*. Modern technical advantages make engines like the Russian RD-180 much more powerful and fuel-efficient. Nevertheless, for its time the F-1 was a milestone in rocket engineering. And it still is an awesome beast to look at. So here's the first part of my 1/48 F-1 engine!


(full story after the jump)

*There was one engine planned that would've been bigger than the F-1 and that was called the M-1. But that was never made, because the rocket it was intended for, the immensely huge Nova, was cancelled.

05 September 2013

It looks like there's nothing going on...

...But that's not true at all.
Inside my head I am dealing with the things I think might be the main obstacles in the next big build. Trying to visualise the parts and construction in my head makes it a lot easier for me for when the time is there to actually build the model.
Also making drawings is helping to make the model come to life for me. Pretty soon I will treat you here on a smorgasbord of little drawings I made of how I envision what I want to build.

I also have bought a lot of new paper already. Funnily, it only cost me about 5 euros. For that amount of money one can't even buy a proper plastic model of an aircraft. 
(I said: proper) 

The first thing I am going to build in the coming weeks is an 1/48 F-1 engine.
This way I can make a nice big engine model that is showable without the batting the original engines had. The rest of 'em will be built in 96th with the batting around them.


An F-1on display at KSC. The base of the engine bell is 3,70 meter and the height is 5, 80 meter. 
Not what you call a small engine. This is how it looks without the batting.
(picture source: Wikipedia)
And this is how it looked, bolted down underneath the Saturn. 
The batting was made from asbestos, so not the healthiest stuff to be around. 
But it apparently helped the engine staying in one piece during lift off.
(picture source:The Apollo Saturn reference Page)
More in a little while. Thanks for keeping visiting here.
--PK


02 September 2013

Oh, the sweet vacuum after finishing a build...

The SCA with the Enterprise on her back has flown into the world, together with the three T-38's.
And the cutting mat is cleaned up again, the paper shreds are in the waste paper basket and the tools and knife are at their storage location. Another build can be ticked off of the list.
Now what's next?
I am not going to sit back and relax. There is, as usual, already some new project lurking in the corners of my mind and it's getting near the surface. There already is some research on the way and I am gathering facts and details. That's half of the fun, really. Getting to know your topic. I know there are some things waiting, like the Loral 1300 bus I started. And I promise that will be finished too some day. But for now there is a new big project coming up and when I mean big I mean big - well, at least for me it's big.
More on that later. There might be an inbetweenie or two before I start the big one.
For now, I'm still doing research, tests and a couple of small pre-build modifications.
Curious? well, you've got to stay curious for a little longer then.
Oh, allright, one teaser, then.
source: Wikimedia Commons
See you soon!
--PK

01 September 2013

ALT 1977 1/400 [22]: Finished!

Here it is. Shuttle Enterprise on her way to the first free flight. The frame measures 31 x 42 cm, the T-38s are just short of 35 mm. The shuttle / SCA stack is 180 mm in length.
The sky unfortunately is overcast, so I couldn't take any nice photos with the sky as a backdrop. That will come later, I promise you.
Here are some photos for the time in between.
You can click for bigger.
 After the jump, there are five more photos.